Practice Lab 6.1 – Cloud flows
Scenario
You are a Power Platform functional consultant and have been assigned to the Fabrikam project for the next stage of the project.
In this practice lab, you change an existing approvals flow and add error handling. You will also set the value of the environment variable used by the flow. You will also create a new flow to automatically set the actual end date on projects.
Exercise 1 – Edit approval cloud flow
In this exercise, you will enhance the existing approvals flow.
Task 1.1 – Change the approver in flow
In this task, you will perform the following changes to the flow:
- Replace the Get Approver row with the calculated column for Approver Email Address
-
Navigate to the Power Apps Maker portal https://make.powerapps.com.
-
Make sure you are in the Practice environment.
-
Select Solutions.
-
Click to open the Fabrikam Environmental solution.
-
In the Objects pane on the left, select Cloud flows.
-
Select the Request Approval flow, click on the ellipses (…), and select Edit.
-
Select the Start and wait for an approval step.
NOTE: The Item link field use an environment variable, Outcome form link.
-
Click in the Assigned To field and clear the current contents.
-
In Dynamic content, search for email and select Approver Email. You may need to scroll down in the Dynamic Content window to see this.
-
On the Get Approver step, select the ellipses (…) and select Delete.
Task 1.2– Check if an approver is assigned to the outcome
In this task, you will perform the following changes to the flow:
- Add check for missing approver
-
Hover the mouse between the Get Outcome and Start and wait for an approval steps and click on + (Insert new step) > Add an action.
-
Select the Control connector and then select Condition.
-
Click in the first Choose a value field.
-
In Dynamic content, search for approver and select Approver Email.
-
Change the Operator to is not equal to.
-
Click in the right-hand Choose a value field.
-
In Dynamic content, select the Expression tab.
-
Enter null and click OK.
-
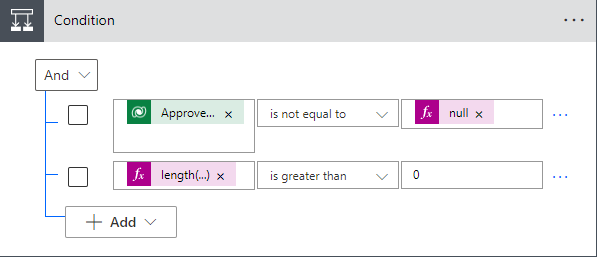
In the condition step, click + Add and then select Add row.
-
Click in the Choose a value field.
-
In Dynamic content, select the Expression tab.
-
Enter length() and position the cursor between the brackets.
-
Select the Dynamic content tab, select See more for Get Outcome, and select the Approver Email and click OK.
-
The expression should be as follows:
length(outputs('Get_Outcome')?['body/contoso_approveremail']) -
Change the Operator to is greater than.
-
Click in the right-hand Choose a value field and enter 0
-
In the condition step, note the And drop-down is set to And.
-
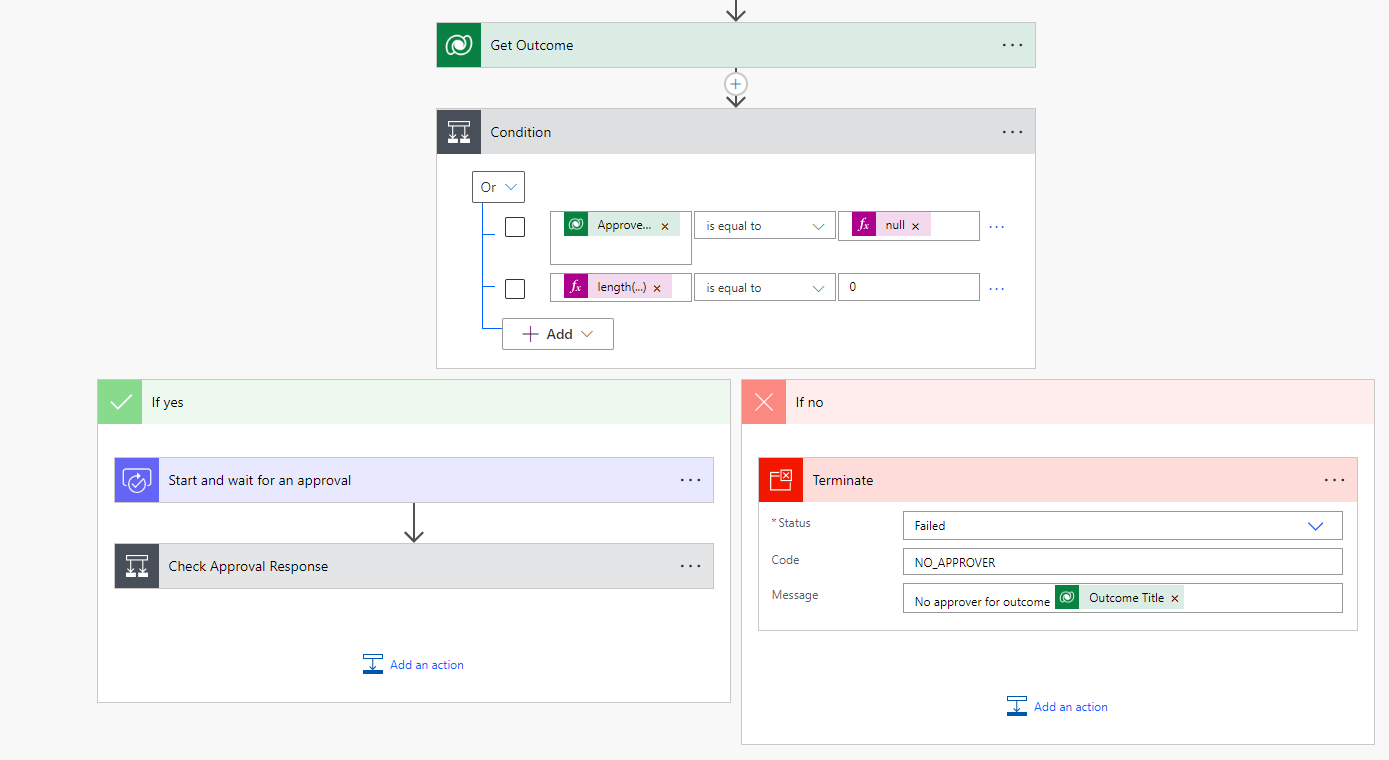
Drag the Start and wait for an approval step into the If yes branch of the condition.
-
Drag the Check Approval response step into the If yes branch of the condition.
-
In the If no branch of the condition, click Add an action.
-
Select the Control connector and then select Terminate.
-
Select Failed for the Status drop down.
-
Enter NO_APPROVER for Code.
-
Enter No approver for outcome and in Dynamic content select Outcome Title.
-
Click Save.
Task 1.3 – Error handling
In this task, you will perform the following changes to the flow:
- Add error handing to the approval step
-
On the Check Approval Response step, select the ellipses (…) and select Configure run after. Only is successful is selected.
-
Click Cancel.
-
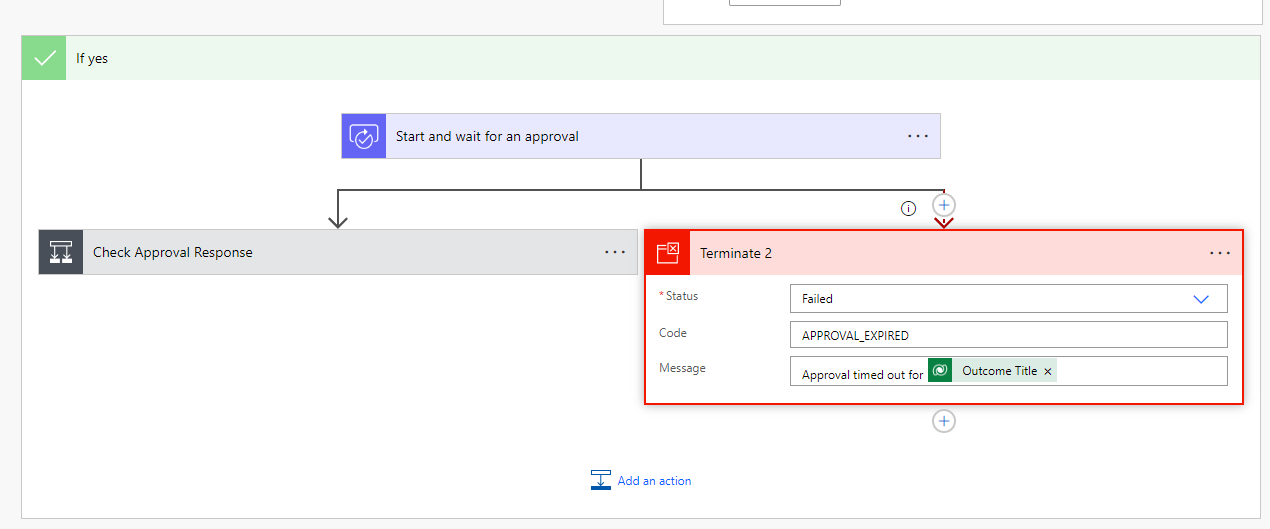
Hover the mouse between the Start and wait for an approval and Check Approval Response steps and click on + (Insert new step) and then select Add a parallel branch.
-
Select the Control connector and then select Terminate.
-
Select Failed for the Status drop down.
-
Enter APPROVAL_EXPIRED for Code.
-
Enter Approval timed out for ** and in **Dynamic content, select Outcome Title.
-
On the Terminate 2 step, select the ellipses (…) and select Configure run after.
-
Uncheck is successful.
-
Check the other three boxes.
-
Click Done.
-
Click Save
Task 1.4 – Set status to rejected
In this task, you will perform the following changes to the flow:
- Set status to rejected if the approval is rejected
-
Select and expand the Check Approval Response step.
-
In the If no branch of the condition, click Add an action.
-
Select the Microsoft Dataverse connector and then select Update a row.
-
On the Update a row step, select the ellipses (…) and select Rename.
-
Enter Set Outcome to rejected.
-
Select Outcomes for Table name.
-
Click in the Row ID field.
In Dynamic content, search for outcome and select Outcome under the Get Outcome section.
-
Expand Show advanced options.
-
Select No for Approved.
-
Select Rejected for Status Reason.
-
Click Save
-
Click the back arrow icon in the top-left of the flow editor.
Exercise 2 – Edit environment variable
In this exercise, you will find the URL for your environment and update the environment variable.
Task 2.1 – Find the URL for your environment
In this task, you will:
- Discover the URL for the outcome form in the model-driven app
-
Navigate to the Power Apps Maker portal https://make.powerapps.com.
-
Make sure you are in the Practice environment.
-
Select Solutions.
-
Click to open the Fabrikam Environmental solution.
-
In the Objects pane on the left, select Apps.
-
Select the Environmental Project Delivery app, click on the ellipses (…), and select Play.
-
In the left-hand navigation, select Outcomes.
-
Open any outcome record.
-
Copy the URL of the window.
-
Open Notepad and paste the URL.
-
The URL will look like the link below.
https://practice.crm.dynamics.com/main.aspx?appid=de79a38a-138b-4a89-91fb-b12ca31d227b&pagetype=entityrecord&etn=contoso_outcome&id=717c05a8-2c2c-ed11-9db1-00224820046d -
Copy everything before the last GUID.
https://practice.crm.dynamics.com/main.aspx?appid=de79a38a-138b-4a89-91fb-b12ca31d227b&pagetype=entityrecord&etn=contoso_outcome&id=
Task 2.2 – Update environment variable
In this task, you will:
- Update the environment variable
-
Navigate to the Power Apps Maker portal https://make.powerapps.com.
-
Make sure you are in the Practice environment.
-
Select Solutions.
-
Click to open the Fabrikam Environmental solution.
-
In the Objects pane on the left, select Environment variables.
-
Select the Outcome form link variable, click on the ellipses (…), and select Edit.
-
Click + New value.
-
Paste the URL from the previous task.
-
Click Save.
Task 2.3 – Restart flow
In this task, you will:
- turn the flow off and on again to pick up the change to the environment variable
-
In the Objects pane on the left, select Cloud flows.
-
Select the Request Approval flow, click on the ellipses (…), and select Turn off.
-
Select the Request Approval flow, click on the ellipses (…), and select Turn on.
Exercise 3 - Create automatic cloud flow for project status
In this exercise, you will create a new cloud flow that is triggered when the project status is updated. The flow will set the actual end date if the project status is completed.
Task 3.1 - Create a new cloud flow
In this task, you will perform the following:
- create a new flow that is triggered by project status change
- add an action to set the actual end date
-
Navigate to the Power Apps Maker portal https://make.powerapps.com.
-
Make sure you are in the Practice environment.
-
Select Solutions.
-
Click to open the Fabrikam Environmental solution.
-
In the Objects pane on the left, select Cloud flows.
-
Click + New > Automation > Cloud flow > Automated.
-
Enter Set Project End Date for Flow name
-
Search for Dataverse in Chose how to trigger this flow and select the When a row is added, modified, or deleted action.
-
Click Create.
-
Select Modified for Change type.
-
Select Projects for Table name.
-
Select Organization for Scope.
-
Select the ellipses (…) and select Rename.
-
Enter Project Status changed.
-
Expand Show advanced options.
-
Click into Select columns and enter contoso_projectstatus. The flow will only trigger when the project status value is changed.
-
Click on + New step.
-
Select the Microsoft Dataverse connector and then select Update a row.
-
On the Update a row step, select the ellipses (…) and select Rename.
-
Enter Set Actual End Date.
-
Select Projects for Table name.
-
Click in the Row ID field.
-
In Dynamic content, search for project and select Project.
-
Expand Show advanced options.
-
Click in the Actual End field.
-
In Dynamic content, select the Expression tab.
-
Enter utcNow() and click OK.
-
Click Save.
Task 3.2 - Configure trigger
In this task, you will perform the following:
- restrict the flow trigger to only fire when the project status is completed and the actual end date has not been entered
-
Select the trigger step (Project Status changed).
-
Expand Show advanced options if not already expanded.
-
Click into Filter rows and enter the following OData filter expression:
(contoso_projectstatus eq 330650003 and contoso_actualenddate eq null) -
Click Save.
-
Click the back arrow icon in the top-left of the flow editor.