Practice Lab 2.1 – Business rules
Scenario
You are a Power Platform functional consultant and have been assigned to the Fabrikam project for the next stage of the project.
In this practice lab, you will be creating business rules to show and hide the lookup columns in the model-driven app form for the Resource table and to set the status of Milestone rows to completed when the percentage complete is 100%.
Exercise 1 – Create Business Rule
Task 1.1 – Create Resource business rules
-
Navigate to the Power Apps Maker portal https://make.powerapps.com.
-
Make sure you are in your Practice environment.
-
Select Solutions.
-
Click to open the Fabrikam Environmental solution.
-
In the Objects pane on the left, click and expand Tables.
-
Select the Resource table.
-
Under Customizations, click on Business rules.
-
Click on the existing business rule, Set Resource Name, to open the business rule designer. Analyze how this business rule works. This business rule controls the visibility and requirement for the resource name based on the selection of resource type.
-
Close the Business rule designer.
-
Click Done.
-
Click + New business rule.
-
Next to New business rule name at the top of the screen, click on the drop-down caret.
-
Enter Resource Type Internal for Business Rule Name. You can click on the drop-down caret again to collapse this section.
-
In the Scope drop-down in the top-right of the business rules designer select All Forms.
-
Select the Condition tile in the canvas and in the Properties pane enter Check Resource Type for Display Name..
-
In the Rule 1 section, select Resource Type for Field, select Equals for Operator, select Value for Type, and check Internal for Value.
-
Click Apply.
-
Select the Components tab.
-
Drag the Set Visibility action and place it on the True side (on the right-hand side) of the condition.
-
Enter Show User for Display Name, select User for Field, select Yes for Visible and click Apply.
-
Drag the Set Visibility action and place it on the right-hand side of the Show User tile.
-
Enter Hide Contact for Display Name, select Contact for Field, select No for Visible and click Apply.
-
Click on + Add and select Add Set Business Required and then click the plus icon to the right of the Hide Contact tile.
-
Enter User Required for Display Name, select User for Field, select Business Required for Status and click Apply.
-
Click on + Add and select Add Set Business Required and then click the plus icon to the right of the User Required tile.
-
Enter Contact Not Required for Display Name, select Contact for Field, select Not Business Required for Status and click Apply.
-
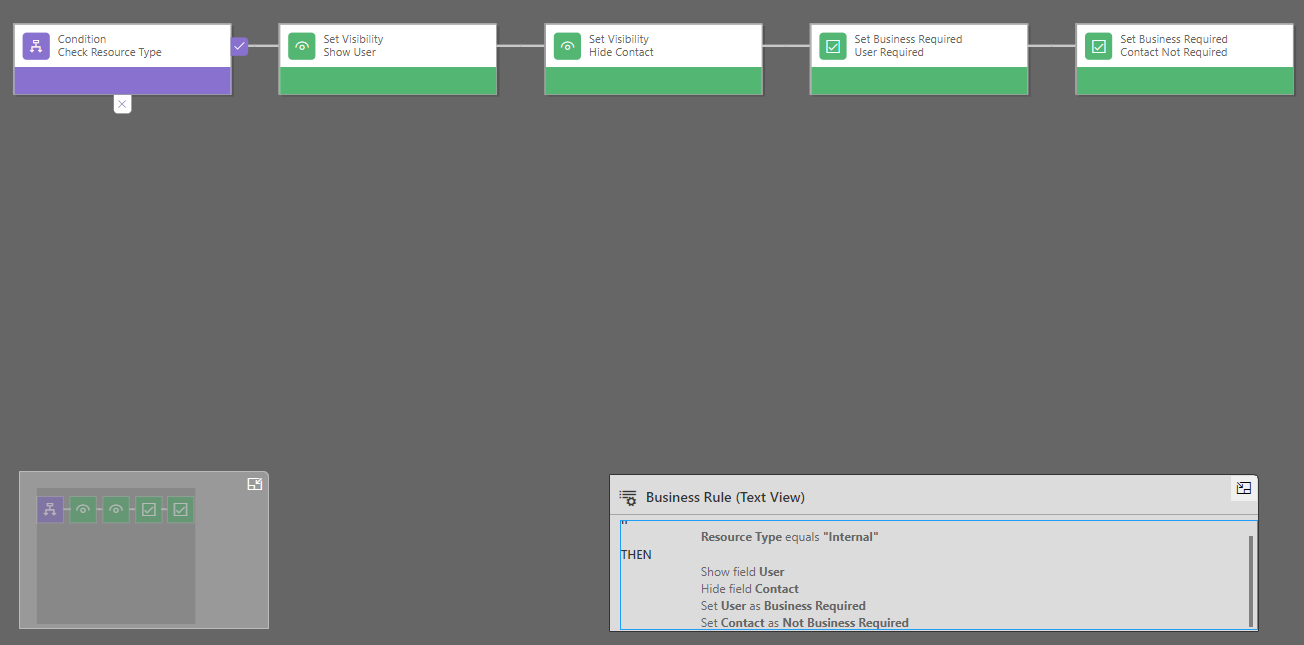
The Business Rule (Text View) should look as follows:
IF Resource Type equals "Internal" THEN Show field User Hide field Contact Set User as Business Required Set Contact as Not Business Required -
Click Save. You should see the message Validation successful.
-
Click Activate.
-
In the Process activation confirmation dialog, click Activate.
-
Click Save As.
-
Next to New business rule name at the top of the screen, click on the drop-down caret.
-
Enter Resource Type External for Business Rule Name.
-
Select the Check Resource Type tile.
-
In the Rule 1 section, uncheck Internal and check External.
-
Click Apply.
-
Select the Show User tile.
-
Enter Hide User for Display Name, select No for Visible and click Apply.
-
Select the Hide Contact tile.
-
Enter Show Contact for Display Name, select Yes for Visible and click Apply.
-
Select the User Required tile.
-
Enter User Not Required for Display Name, select Not Business Required for Status and click Apply.
-
Select the Contact Not Required tile.
-
Enter Contact Required for Display Name, select Business Required for Status and click Apply.
-
The Business Rule (Text View) should look as follows:
IF Resource Type equals "External" THEN Hide field User Show field Contact Set User as Not Business Required Set Contact as Business Required -
Click Save. You should see the message that Validation was successful.
-
Click Activate.
-
In the Process activation confirmation dialog, click Activate.
-
Close the business rule designer tab.
-
Click Done.
Task 1.2 – Create Milestone business rules
-
In the Objects pane on the left, select the Milestone table.
-
Under Customizations, click on Business rules.
-
Click + New business rule.
-
Next to New business rule name at the top of the screen, click on the drop-down caret.
-
Enter Milestone Completed for Business Rule Name.
-
In the Scope drop-down in the top-right of the business rules designer select Entity.
-
Select the Condition tile in the canvas and in the Properties pane enter Percentage Complete for Display Name..
-
In the Rule 1 section, select Milestone Percentage Complete for Field, select Equals for Operator, select Value for Type, and enter 100 for Value.
-
Above Rule 1, click + New to add Rule 2.
-
In the Rule 2 section, select Milestone status for Field, select Does not equal for Operator, select Value for Type, and check Completed and Cancelled for Value.
-
Select AND for Rule Logic.
-
Click Apply.
-
The Condition Expression (Text View) should look as follows
(Milestone Percentage Complete Equals [100]) AND (Milestone status Does not equal [Completed,Cancelled]) -
Click on + Add and select Add Set Field Value and then click the plus icon to the right of the Condition tile.
-
Enter Mark Complete for Display Name, select Milestone status for Field, select Value for Type, and select Completed for Value.
-
Click Apply.
-
The Business Rule (Text View) should look as follows:
IF Milestone Percentage Complete equals 100 AND Milestone status does not equal "Completed,Cancelled" THEN Set Milestone status to "Completed" -
Click Save. You should see the message that Validation was successful.
-
Click Activate.
-
In the Process activation confirmation dialog, click Activate.
-
Close the business rule designer tab.
-
Click Done.
Challenge (Optional)
Edit the Set Resource Name business rule on the Resource table to hide both lookup columns if resource type is not selected and set as not business required.