Practice Lab 1.5 – Columns
Scenario
You are a Power Platform functional consultant and have been assigned to the Fabrikam project for the next stage of the project.
In this practice lab, you will be modifying the properties of existing table columns and creating a new custom columns.
Exercise 1 – Modify and add columns on the Project table
In this exercise, you will be changing properties on existing columns on the Project table in the Fabrikam Environmental solution, creating new columns, and adding an alternate key.
Task 1.1 – Modify properties on existing columns
-
Navigate to the Power Apps Maker portal https://make.powerapps.com.
-
Make sure you are in your Practice environment.
-
Select Solutions.
-
Click to open the Fabrikam Environmental solution.
-
In the Objects pane on the left, click and expand Tables.
-
Select the Project table.
-
Under Schema, click on Columns.
-
Select the Project Description column.
-
In the Edit column pane that appears on the right-hand side of the screen, expand Advanced options and scroll down.
-
Change the Maximum character count to 10000.
-
Click Save.
-
Select the Project Status column.
-
In the Edit column pane that appears on the right-hand side of the screen, change the Required drop-down to Business required.
-
Expand Advanced options.
-
Under Dashboard, check the Appears in dashboard’s global filter box.
-
Click Save.
-
Select the Project Type column.
-
In the Edit column pane that appears on the right-hand side of the screen, expand Advanced options.
-
Check the Appears in dashboard’s global filter box.
-
Click Save.
-
Select the Estimated End column.
-
In the Edit column pane that appears on the right-hand side of the screen, verify that the Format is Date only.
-
Expand Advanced options.
-
Verify that the Time zone adjustment is User local.
-
Under Dashboard, check the Sortable box.
-
Click Save.
Task 1.2 – Create an auto number column
-
Click + New column.
-
Enter Project Code for Display Name.
-
Enter Unique project reference for Description.
-
Select Autonumber in the Data type drop-down.
-
Enter PROJ for Prefix.
-
Click Save.
Task 1.3 – Add an alternate key
-
In the Objects pane on the left, expand Tables, and select Project.
-
Under Schema, click on Keys.
-
Click + New key.
-
Enter Project Reference for Display Name.
-
Check the Project Code box
-
Click Save.
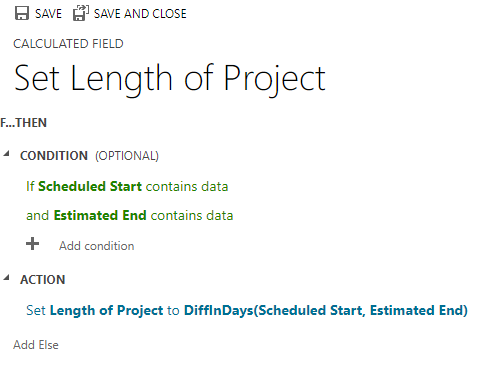
Task 1.4 – Add a calculated column
-
In the Objects pane on the left, expand Tables, and select Project.
-
Under Schema, click on Columns.
-
Click + New column.
-
Enter Length of Project for Display Name.
-
Enter Number of days for Description.
-
Select Number in the Data type drop-down. The Data type will be set to Whole Number and the Format will be set to None.
-
Change the Behavior drop-down to Calculated.
-
Click on Save and edit.

NOTE: You may need to disable the pop-up blocker in your browser and edit the Length of Project column.
-
When a new browser window opens, click + Add condition.
-
Select Scheduled Start for Field.
-
Select Contains data for Operator.
-
Click the green check mark.
NOTE: You may need to resize the window to see the check mark.
-
Click + Add condition.
-
Select Estimated End for Field.
-
Select Contains data for Operator.
-
Click the green check mark.
-
Click + Add Action.
-
Enter the following formula:
DIFFINDAYS(contoso_scheduledstartdate,contoso_estimatedenddate)NOTE: You can use intellisense to type and select the elements in the formula.
-
Click the blue check mark.
-
Click SAVE AND CLOSE.
Exercise 2 – Modify and add columns on the Project Funding table
In this exercise, you will be changing properties on existing columns on the Project Funding table in the Fabrikam Environmental solution and adding a new column.
Task 2.1 – Modify value range on an existing column
-
Navigate to the Power Apps Maker portal https://make.powerapps.com.
-
Make sure you are in the Practice environment.
-
Select Solutions.
-
Click to open the Fabrikam Environmental solution.
-
In the Objects pane on the left, click and expand Tables.
-
Select the Project Funding table.
-
Under Schema, click on Columns.
-
Select the Funding Percentage column.
-
In the Edit column pane that appears on the right-hand side of the screen, expand Advanced options and scroll down.
-
Change the Minimum value to 0.
-
Change the Maximum value to 100.
-
Click Save.
Task 2.2 – Create a currency column
-
Click + New column.
-
Enter Funding Amount for Display Name.
-
Enter Value of funding from the funder on the project for Description.
-
Select Currency in the Data type drop-down.
-
Expand Advanced options and scroll down.
-
Change the Minimum value to 0.
-
Change the Maximum value to 99999999 (Eight 9’s).
-
Click Save.
Exercise 3 – Modify a lookup column on the Milestone table
In this exercise, you will be changing properties on a lookup column on the Milestone table in the Fabrikam Environmental solution. Lookup columns when created by a relationship do not have auditing enabled by default.
Task 3.1 – Modify audit on lookup column
-
Navigate to the Power Apps Maker portal https://make.powerapps.com.
-
Make sure you are in your Practice environment.
-
Select Solutions.
-
Click to open the Fabrikam Environmental solution.
-
In the Objects pane on the left, click and expand Tables.
-
Select the Milestone table.
-
Under Schema, click on Columns.
-
Select the Project column.
-
In the Edit column pane that appears on the right-hand side of the screen, change the Required drop-down to Business required.
-
Expand Advanced options and scroll down.
-
Check the Enable auditing box.
-
Click Save.
Exercise 4 – Add a choice column
In this exercise, you will be creating a choice column to replace the use of status reasons on the Milestone and Outcome tables.
NOTE: Status reasons cannot be changed in an editable grid.
Task 4.1 – Create choice
-
Navigate to the Power Apps Maker portal https://make.powerapps.com.
-
Make sure you are in your Practice environment.
-
Select Solutions.
-
Click to open the Fabrikam Environmental solution.
-
In the Objects pane on the left, click Choices
-
Click + New, select More, and then select Choice.
-
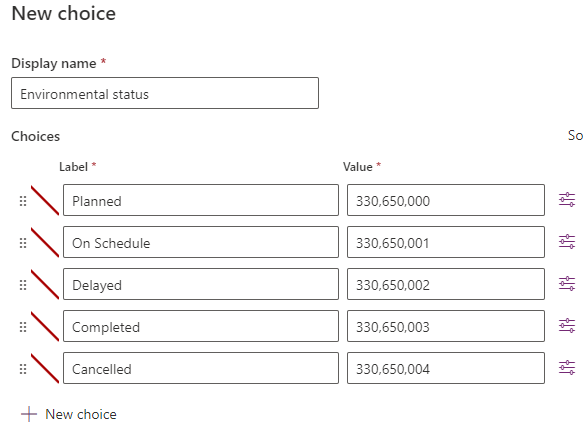
Enter Environmental Status for Display Name.
-
Enter Planned for Label
-
Click + New choice.
-
Enter On Schedule for Label
-
Click + New choice.
-
Enter Delayed for Label
-
Click + New choice.
-
Enter Completed for Label
-
Click + New choice.
-
Enter Cancelled for Label
-
Click Save.
Task 4.2 – Add choice to Milestone table
-
In the Objects pane on the left, click and expand Tables.
-
Select the Milestone table.
-
Under Schema, click on Columns.
-
Click + New column.
-
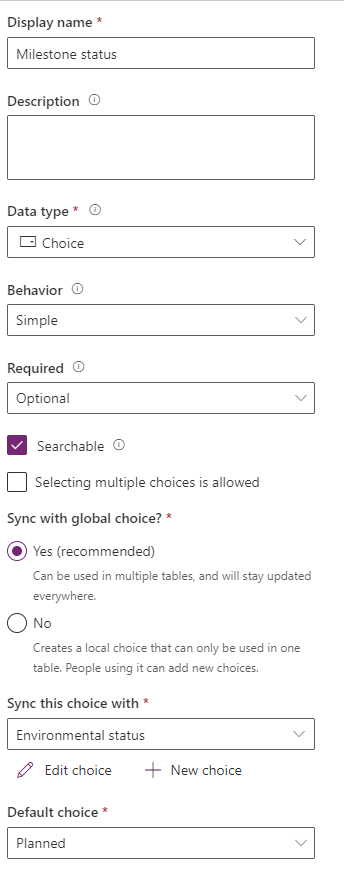
Enter Milestone Status for Display Name.
-
Select Choice in the Data type drop-down and then select Choice again.
-
Select Environmental Status in the Sync this choice with drop-down.
-
Select Planned in the Default choice drop-down.
-
Click Save.
Task 4.3 – Add choice to Outcome table
-
In the Objects pane on the left, click and expand Tables.
-
Select the Outcome table.
-
Under Schema, click on Columns.
-
Click + New column.
-
Enter Outcome Status for Display Name.
-
Select Choice in the Data type drop-down and then select Choice again.
-
Select Environmental status in the Sync this choice with drop-down.
-
Select Planned in the Default choice drop-down.
-
Click Save.
Exercise 5 – Create columns on the Project Outcome table
In this exercise, you will be creating columns on the Project Outcome custom table that you created in an earlier lab.
Task 5.1 – Create columns
-
Navigate to the Power Apps Maker portal https://make.powerapps.com.
-
Make sure you are in your Practice environment.
-
Select Solutions.
-
Click to open the Fabrikam Environmental solution.
-
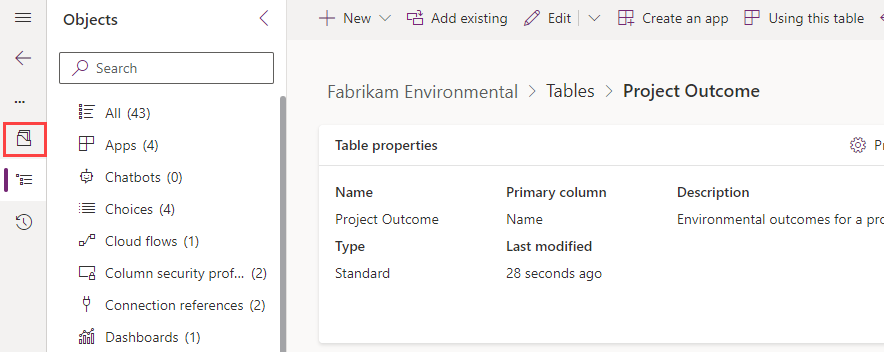
In the Objects pane on the left, click and expand Tables.
-
Select the Project Outcome table.
-
Click + New, and then select Column.
-
Enter Stakeholders Notified for Display Name.
-
Select Choice in the Data type drop-down and then select Yes/no.
-
Click Save.
-
Click + New, and then select Column.
-
Enter Outcome Completed Date for Display Name.
-
Select Date and time in the Data type drop-down and then select Date only.
-
Click Save.
-
Click + New, and then select Column.
-
Enter Comments for Display Name.
-
Select Text in the Data type drop-down and then under Multiple lines of text select Plain text.
-
Click Save.
Task 5.2 – Publish changes
-
In the solution select the Overview page.
-
Click on Publish all customizations.