Lab 4: How to build an automated solution
Scenario
Bellows College is an educational organization with multiple buildings on campus. Campus visitors are currently recorded in paper journals. The information is not captured consistently, and there are no means to collect and analyze data about the visits across the entire campus.
Campus administration would like to modernize their visitor registration system where access to the buildings is controlled by security personnel and all visits are required to be pre-registered and recorded by their hosts.
Throughout this course, you will build applications and perform automation to enable the Bellows College administration and security personnel to manage and control access to the buildings on campus.
In this lab, you will create a Power Automate flow to email a visitor when a visit is scheduled.
High-level lab steps
The following have been identified as requirements you must implement to complete the project:
- Contacts need to be notified via email when a visit is scheduled.
Prerequisites
- Completion of Module 0 Lab 0 - Validate lab environment
- Completion of Module 2 Lab 1 - Data Modeling
- Completion of Module 2 Lab 3 - How to build a model-driven app
- John Doe contact created with a personal email address populated
Exercise 1: Create Visit Notification flow
Objective: In this exercise, you will create a Power Automate flow that implements the requirement. The visitor should be sent an email that includes the unique code assigned to the visit when a visit is created.
Task #1: Create a flow
-
Navigate to https://make.powerapps.com. You may need to reauthenticate - click Sign in and follow instructions if needed.
-
Select your [my initials] Practice environment at the top right if it is not already selected.
-
In the left navigation, select Flows.
-
If prompted, select Get started.
-
Click New flow and select Automated cloud flow.
-
Enter “Visit Notification” for Flow name.
-
In Choose your flow’s trigger, search for Dataverse.
-
Select the trigger When a row is added, modified or deleted, and then click Create.
-
Populate the trigger conditions for the flow:
-
Select Added for Change type
-
Select Visits for Table name
-
Select Organization for Scope
-
On the trigger step, click the ellipsis (…) and click Rename. Rename this trigger “When a visit is added”. This is a good practice, so you and other flow editors can understand the purpose of the step without having to dive into the details.
-
Task #2: Create a step to get the visitor row
-
Select + New step. This step is required to retrieve visitors information, including email address.
-
Search for Dataverse.
-
Select the Get a row by ID action.
-
Select Contacts as Table name
-
Select the Row ID field. Notice that a window pops up to select Dynamic content or Expressions.
-
In the Row ID field, select Visitor (Value) from the Dynamic content list. In this step, you are looking up the Contact for the Visit row that was created to trigger this flow. Since email address is part of the Contact table, you will need this information to send the email to the visitor.
-
On this action, click the ellipsis (…) and click Rename. Rename this action “Get the Visitor”. This is a good practice, so you and other flow editors can understand the purpose of the step without having to dive into the details.
Task #3: Create a step to send an email to the visitor
-
Click + New step. This is the step that will send an email to the visitor.
-
Search for mail, select Office 365 Outlook connector and Send an email (V2) action.
-
If asked to Accept terms and conditions for using this action, click Accept.
-
Select Add dynamic content under the To field.
-
Select Email from the Dynamic content list. > Notice that it is beneath the Get the visitor header. This means you are selecting the Email that is related to the Visitor that you looked up in the previous step.
-
Enter Your scheduled visit to Bellows College in the Subject field.
-
Enter the following text in Email Body:
Dynamic content needs to be placed where fields are named in brackets. It is recommended to copy & paste all text first and then add dynamic content in the correct places.
   Dear {First Name},

   You are currently scheduled to visit Bellows Campus from {Scheduled Start} until {Scheduled End}.

   Best regards,

   Campus Administration
   Bellows College
-
Highlight the {First Name} text. Replace it with the First Name field from the Get the Visitor step.
-
Highlight the {Scheduled Start} text. Replace it with the Scheduled Start field When a visit is added step.
-
Highlight the {Scheduled End} text. Replace it with the Scheduled End field from the When a visit is added step.
-
Click Save.
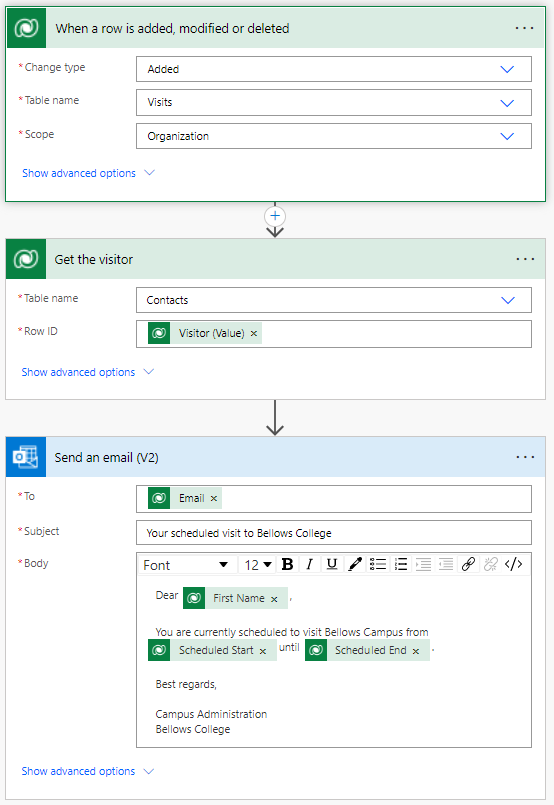
Leave this flow tab open for the next task. You flow should look approximately like the following:
Task #4: Validate and test the flow
-
Open a new tab in your browser and navigate to https://make.powerapps.com.
-
Select your [my initials] Practice environment at the top right if it is not already selected.
-
Click Apps and select the Bellows Campus Management model-driven app you created earlier.
-
Leaving this browser tab open, navigate back to the previous tab with your flow.
-
On the command bar, click Test. Select Manually and then click Test.
-
Navigate to the browser tab with your model-driven app open.
-
Using the navigation on the left, select Visits
-
Press the + New button to add a new Visit record.
-
Complete the Visit record as follows:
-
Name: Test Visit
-
Visitor: John Doe
-
Scheduled Start: Tomorrow at 8:00 AM
-
Scheduled End: Tomorrow at 9:00 AM
-
-
Select the Save and Close button.
-
Navigate to the browser tab with your flow test running. After a short delay, you should see the flow running. This is where you can catch any issues in the flow or confirm that it ran successfully.
After a short delay, you should see an email in your inbox, since you populated John Doe’s email as your personal email. Note that it may go to your Junk Email folder.
Challenges
- Play around with the formatting on the email. How can you make it more professional looking?