Lab 02 – Model driven app
Scenario
A regional building department issues and tracks permits for new buildings and updates for remodeling of existing buildings. Throughout this course you will build applications and automation to enable the regional building department to manage the permitting process. This will be an end-to-end solution which will help you understand the overall process flow.
In this lab we will continue to build on top of the components created in the previous lab. We will now build a Power Apps model-driven app to allow the office staff manage records for the inspectors and the inspectors to manage their own records as needed.
High-level lab steps
As part of creating the model-driven app, you will complete the following:
-
Create a new model-driven app named Permit Management
-
Edit the app navigation to reference the required tables
-
Customize the forms and views of the required tables for the app
Views: As the name suggests, this helps viewing the existing data in the form of table. This is the configuration of the columns that will be displayed on the screen.
Forms: This is where the user creates/updates new records in the tables.
Both will be integrated to the model-driven app for a better user-experience.
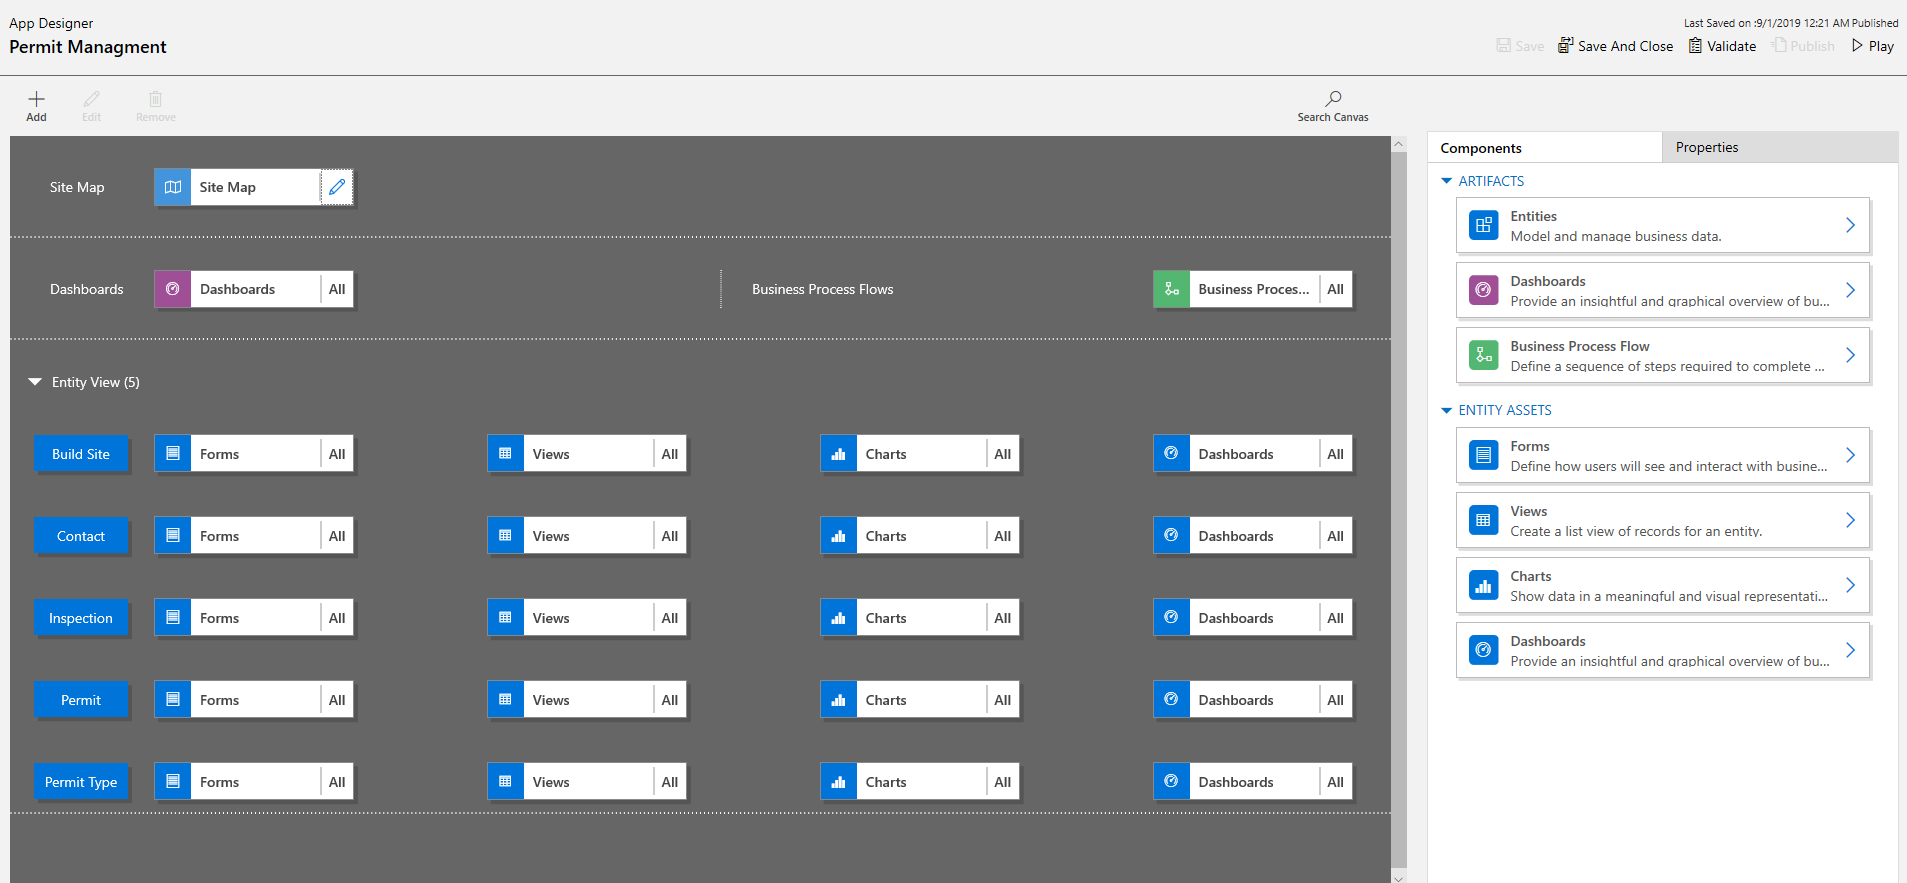
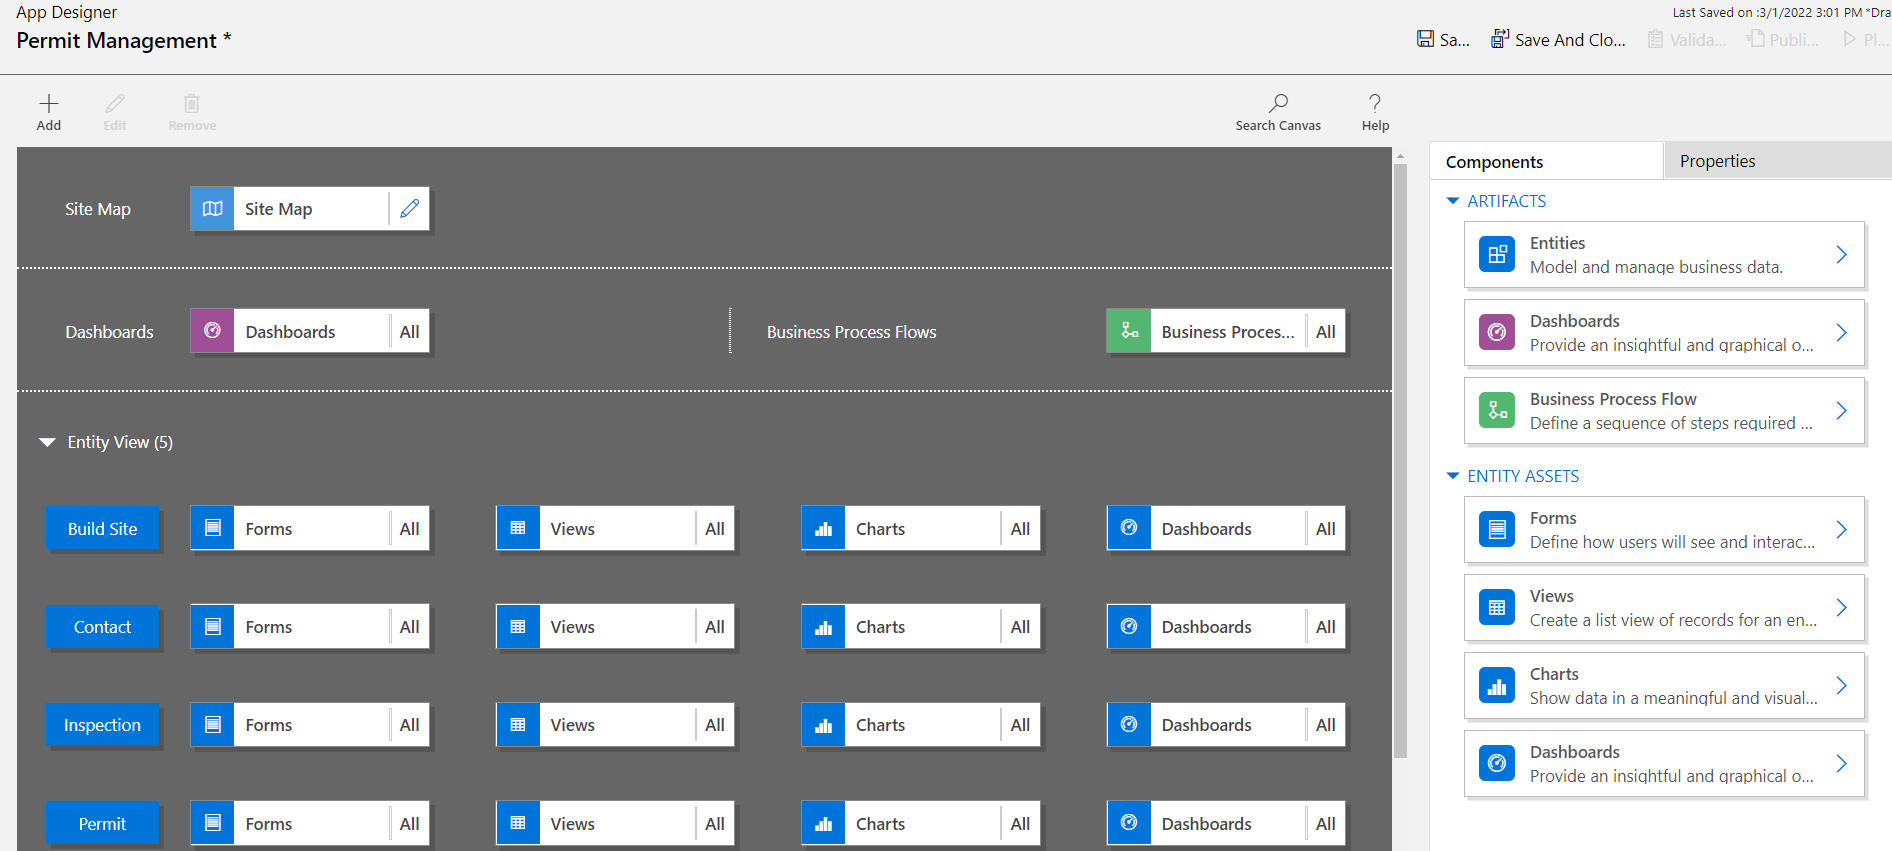
The following is what the model-driven app designer looks like when all the customizations are completed:
Things to consider before you begin
-
What changes should we make to improve the user experience?
-
What should we include in a model-driven app based on the data model we’ve built?
-
What customizations can be made on the sitemap of a model-driven app?
-
Remember to continue working in your DEVELOPMENT environment. We’ll move everything to production once everything is built and tested.
Exercise #1: Customize Views and Forms
Objective: In this exercise, you will customize views and forms of the tables that will be used in the model-driven app.
Task #1: Edit Permit Form and View
-
In your development environment, open the Permit Management solution.
-
Sign in to Power Apps maker portal
-
Select your Dev environment.
-
Select Solutions.
-
Open the Permit Management solution.
-
-
Steps to edit the Permit table form.
-
Open the Permit table.
-
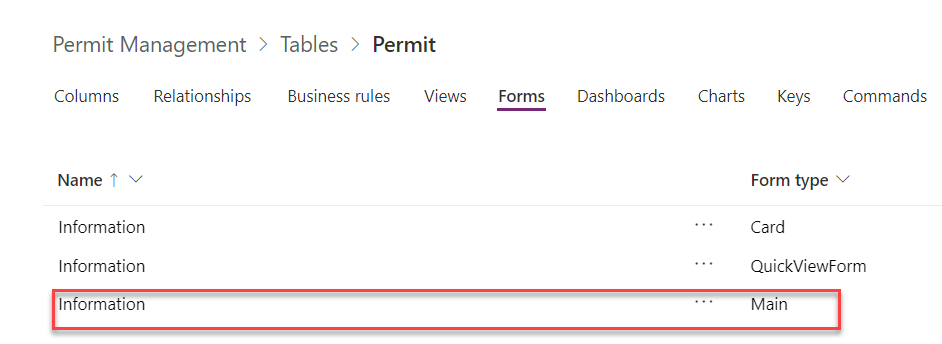
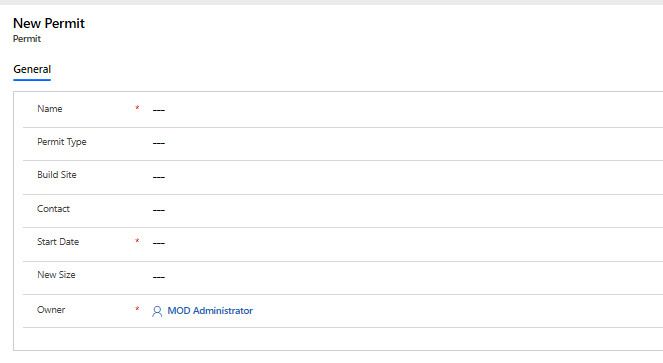
Select the Forms tab and open the Main form. By default, the form has two columns, Name (Primary column) and Owner.
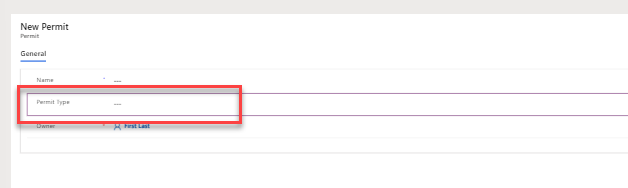
- Drag the Permit Type column to the form and place it below the Name column.
- Add Build Site lookup, Contact lookup, Start Date and New Size to the form.
-
Select the header of the form.
-
Add the Status Reason column to the form header.

-
-
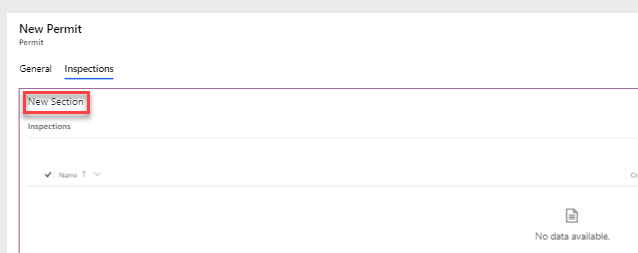
Add new tab for Inspections to the form.
- With focus set on the main body of the form (not in the header) select Add Component.
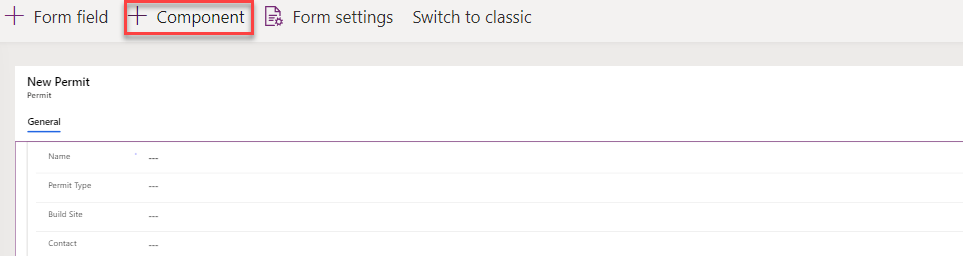
- Select One column tab.
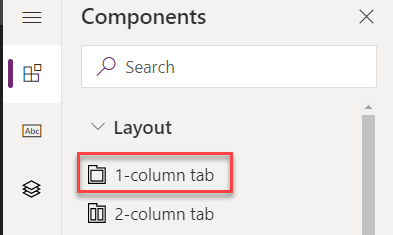
-
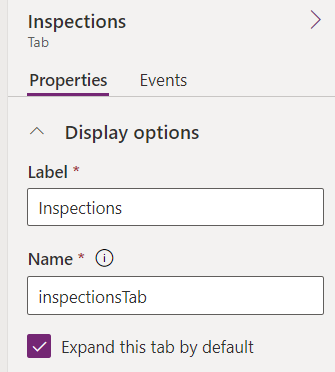
Select the new tab you added.
-
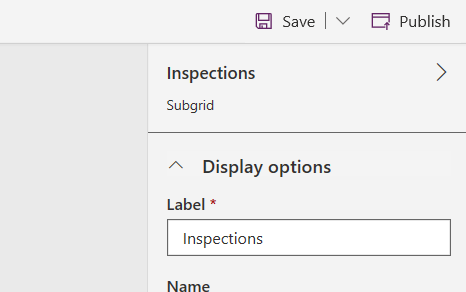
Go to the Properties pane, change the Label to Inspections and the Name to inspectionsTab.
-
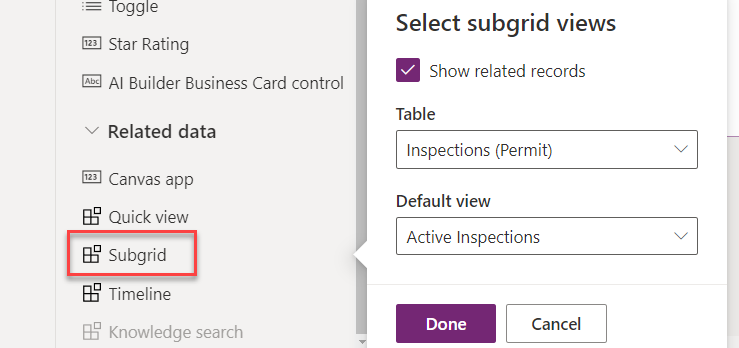
Steps to add Sub-Grid to the Permit form.
-
Select the Inspections tab. Make sure that you have selected the whole tab and not just a section.
-
Select Add Component.
-
Scroll down and select Subgrid, this will open a pop-up to select table.
-
Check the Show related records checkbox, select Inspections (Permit) for Table, select Active Inspections for Default View and select Done.
-
-
Edit Sub-Grid properties.
- Go to the sub-grid properties pane and change the Label to Inspections.
-
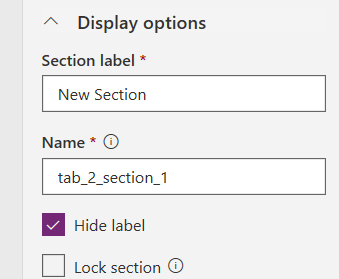
Steps to hide the section label
- Select the section.
- Go to the Properties pane and check the Hide Label checkbox.
-
Select Save and wait for the save to complete.
-
Select Publish and wait for the publishing to complete.
-
Select on the <- Back button. You should now be back to the Permit table Forms tab.
-
Steps to edit the Active Permits view.
-
Select the Views tab and open the Active Permits view.
-
Drag the Build Site column and drop it between the Name and Created On columns.
-
Select on the Permit Type column. The Permit Type column will be added to the view.
-
Select the Contact column. The Contact column will be added to the view.
-
Go to the view designer and select on the chevron icon of the Created On column.
-
Select Remove. Created On column will now be removed from the view.
-
Select Save and wait until the changes are saved.
-
Select Publish and wait for the publishing to complete.
-
-
Select on the <-Back button.
Task #2: Edit Build Site Form and View
-
Open the Permit Management solution.
-
Sign in to Power Apps maker portal
-
While in your dev environment, select Solutions, and open the Permit Management solution.
-
-
Edit the Build Site table form.
-
Select to open the Build Site table.
-
Select the Forms tab and open the Main form.
-
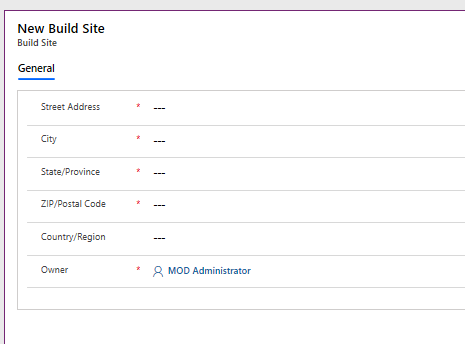
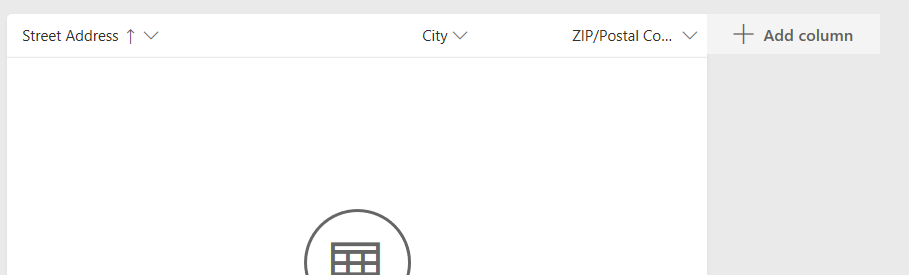
Add City, State/Province, Zip/Postal Code, and Country Region columns to the form between Street Address and Owner.
-
-
Select Save and wait until the changes are saved.
-
Select Publish and wait for the publishing to complete.
-
Select on the <-Back button.
-
Edit the Active Build Sites view.
-
Select the Views tab and open the Active Build Sites view.
-
Add City and Zip/Postal Code to the view.
-
Remove Created On from the view by selecting Remove from the options in column chevron.
-
-
Select Save and wait until the changes are saved.
-
Select Publish and wait for the publishing to complete.
-
Select on the <-Back button.
Task #3: Edit Inspection Form and View
-
Open the Permit Management solution.
-
Sign in to Power Apps maker portal
-
While in your dev environment, select Solutions and open the Permit Management solution.
-
-
Edit the Inspection table form.
-
Open the Inspection table.
-
Select the Forms tab and open the Main form.
-
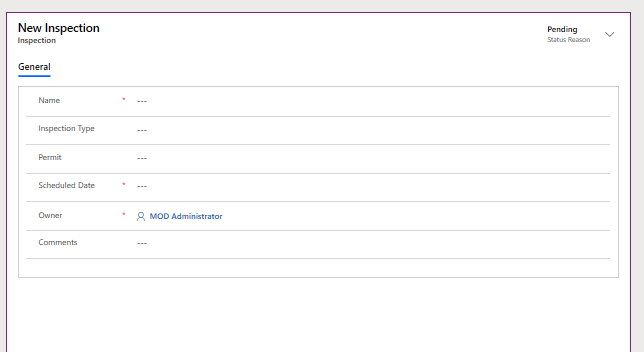
Add Inspection type, Permit, Scheduled Date, and Comments columns to the form. Inspection type, Permit, Scheduled Date should be added between Name and Owner, while Comments will be added after the Owner column.
-
Add the Status Reason column to the header.
-
The form should now look like the image below.
-
-
Select Save and wait until the changes are saved.
-
Select Publish and wait for the publishing to complete.
-
Select on the <-Back button.
-
Edit the Active Inspections view.
-
Select the Views tab and open the Active Inspections Sites view.
-
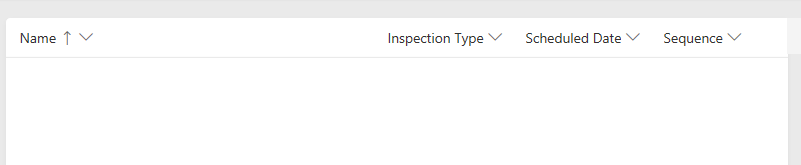
Add Inspection Type, Scheduled Date, and Sequence to the view.
-
Remove Created On from the view by selecting the chevron on the column and select Remove.
-
-
Select Save and wait until the changes are saved.
-
Select Publish and wait for the publishing to complete.
-
Select on the <-Back button.
-
Create new Inspector View for the Inspection table.
-
Make sure you still have the Views tab selected.
-
Select + Add View. This will open a new window to create View.

-
Enter Inspector View for Name and select Create.
-
Add Inspection Type, Permit, Scheduled Date, and Sequence columns to the view.

-
-
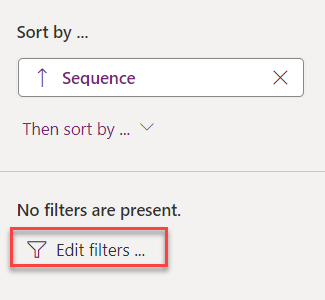
Sort the Inspector View by the sequence.
- Go to the view properties pane and select Sort By.
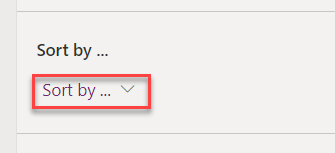
- Select Sequence.
-
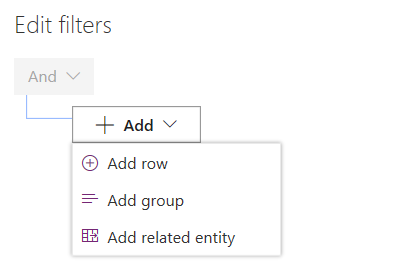
Filter the Inspector View.
- Go to the view properties pane and select Edit Filter. This will open a new pop-up on the right side of the window.
- Select Add and select Add Row.
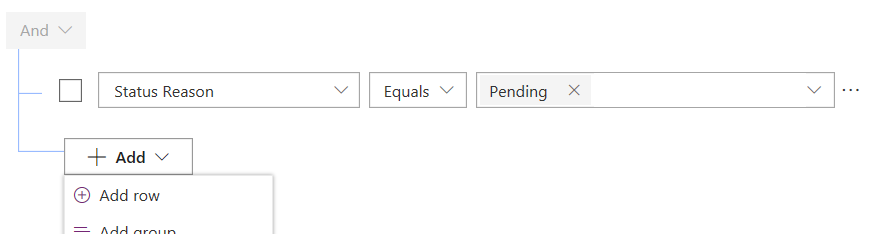
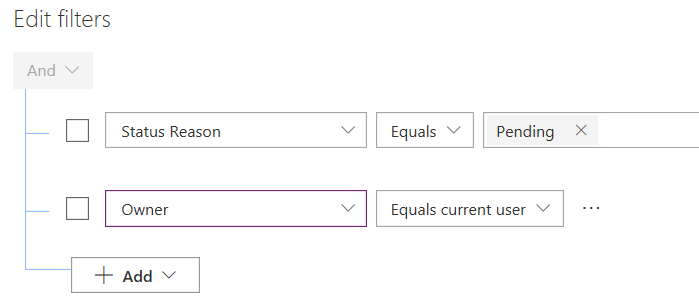
- Set the filter property by Selecting Status Reason in first dropdown and Pending in the third dropdown. Now, select Add and select Add Row again.
- To set the filter property select Owner column in the first dropdown and Equals current user in second dropdown and select OK.
-
Select Save and wait until the changes are saved.
-
Select Publish and wait for the publishing to complete.
-
Select on the <- Back button.
Task #4: Edit Permit Type Form
-
Open the Permit Management solution.
-
Sign in to Power Apps maker portal
-
Select your Dev environment.
-
Select Solutions.
-
Open the Permit Management solution.
-
-
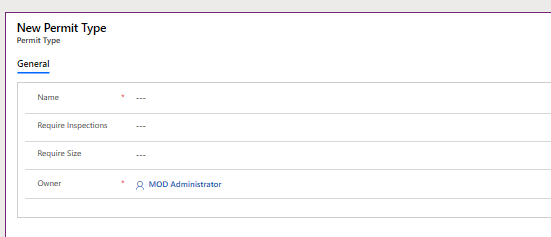
Edit the Permit Type table form.
-
Open the Permit Type table.
-
Select the Forms tab and open the Main form.
-
Add Require Inspections and Require Size columns to the form between Name and Owner.
-
Select Save and wait until the changes are saved.
-
Select Publish and wait for the publishing to complete.
-
Select the <–Back button.
-
-
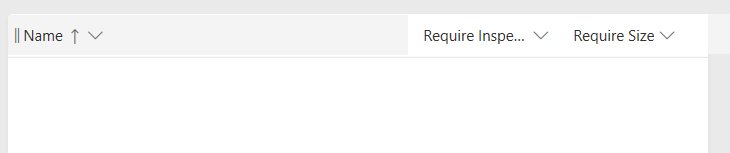
Edit the Permit Type table Active Permit Type view.
-
Select the Views tab and open the Active Permit Type view.
-
Add Require Inspections and Require Size to the view.
-
Remove Created On from the view but selecting the chevron on the column and select Remove.
-
Select Save and wait until the changes are saved.
-
Select Publish and wait for the publishing to complete.
-
Select the <-Back button.
-
Exercise #2: Create Model-Driven Application
Objective: In this exercise, you will create the model-driven app, customize the sitemap, and test the app.
Note: You will see several columns not addressed as you build out your application, particularly on the sitemap steps. We have taken some short cuts in the interest of time for doing the labs. In a real project you would give these items logical names.
Task #1: Create Application
-
Open the Permit Management solution.
-
Sign in to Power Apps maker portal
-
While in your dev environment, open the Permit Management solution.
-
-
Create the Model-Driven application
-
Select + New and select App | Model-Driven App.
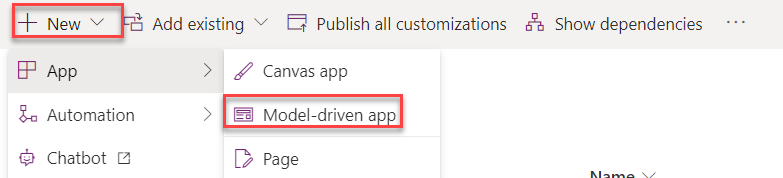
-
Enter Permit Management for Name and select Done.
-
-
Edit Sitemap
- Switch to Classic.

- Click Publish.

- Switch back to Classic.

- Select **Edit Site Map**.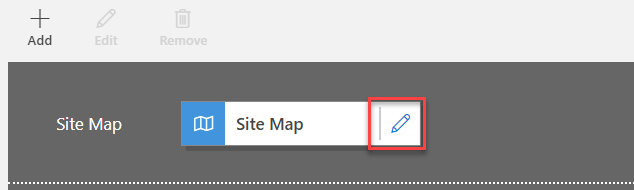
-
Edit the default titles
-
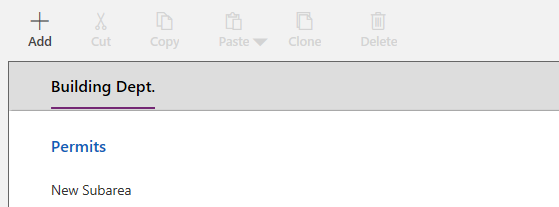
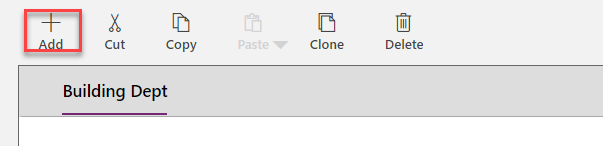
Select New Area.
-
Go to the properties pane and enter Building Dept for Title.
-
Select New Group.
-
Go to the Properties pane and enter Permits for Title.
-
-
Add the Permit table to the sitemap
-
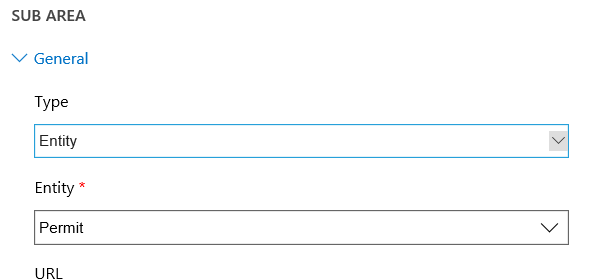
Select New Subarea.
-
Go to the Properties pane and select Entity from the dropdown for Type.
-
Select the Permit table from the dropdown for Entity.
-
-
Add the Inspection table to the sitemap
- Select Permits group and select Add.
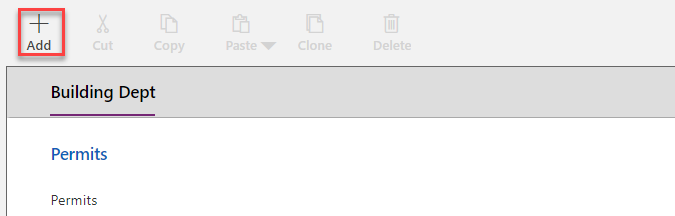
-
Select Subarea.
-
Go to the Properties pane.
-
Select Entity from the dropdown for Type and select the Inspection table from the dropdown for Entity.
-
Add the Permit Type table to the sitemap
-
Select Permits group and select Add.
-
Select Subarea.
-
Go to the Properties pane.
-
Select Entity from the dropdown for Type and select Permit Type from the dropdown for Entity.
-
-
Add new Group to the sitemap
- Select the Building Dept area and select Add.
-
Select Group.
-
Select the group you just added.
-
Go to the Properties pane and enter Contacts for Title.
-
Add the Contact table to the Contacts group.
-
Select the Contacts group.
-
Select Add and select Subarea.
-
Go to the Properties pane.
-
Select Entity from the dropdown for Type and select the Contact table in the dropdown for Entity.
-
-
Add the Build Site table to the Contacts group.
-
Select the Contacts group.
-
Select Add and select Subarea.
-
Go to the Properties pane.
-
Select Entity from the dropdown for Type and select the Build Site table in the dropdown for Entity.
-
-
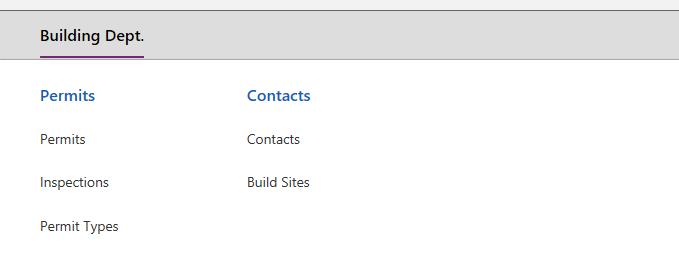
The sitemap should now look like the image below.
-
Select Save.
-
Select Publish to publish the sitemap and wait for the publishing to complete.
-
Select Save and Close to close the sitemap editor.
-
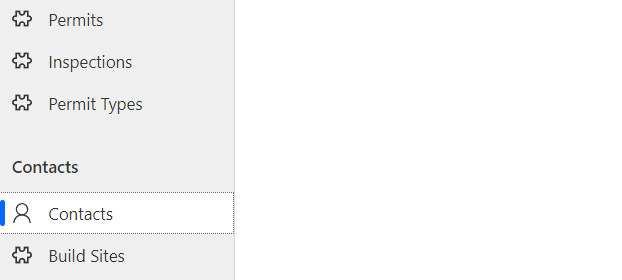
You will see the assets for the tables that were added to the sitemap are now all in the application.
-
Select Save to save the application.
-
Select Validate to validate the changes done in the application. This will show some warnings. Feel free to review them, but we can ignore them, since we have not referenced a specific View and Form for the tables.
-
Select Publish to publish the application and wait for the publishing to complete.
-
Select Save and Close to close the app designer.
-
Click Back.
-
Select Publish all Customizations.
-
Select Apps and your application should now be listed in the list of apps.
-
Select the <- Back button to go back to the solutions list.
Task #2: Test Application
-
Launch the application
- Select Apps and launch the Permit Management app.
-
Create new Contact record
- Select Contacts from the sitemap.
- Select + New.
- Provide First Name as John, Last Name as Doe.
-
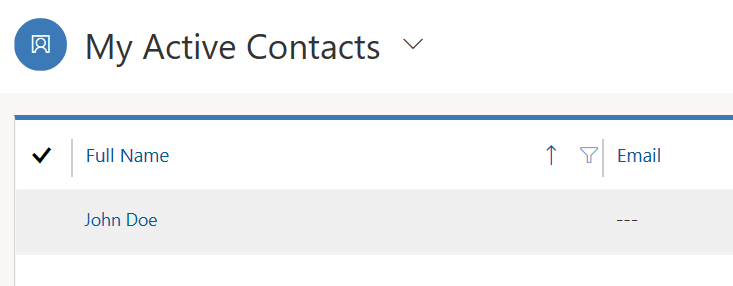
Select Save and Close
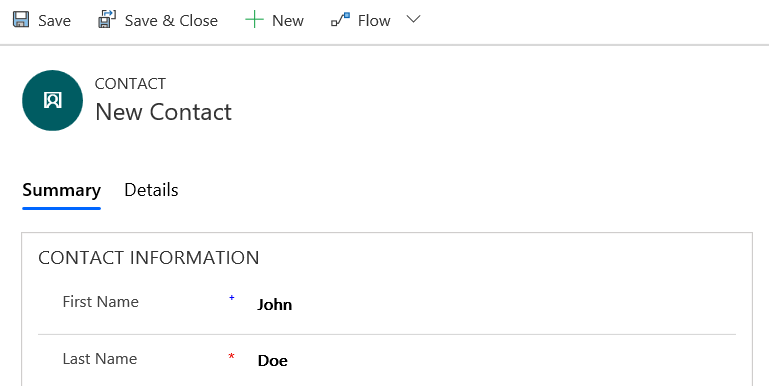
- You should now see the created contact on the Active Contacts view.
-
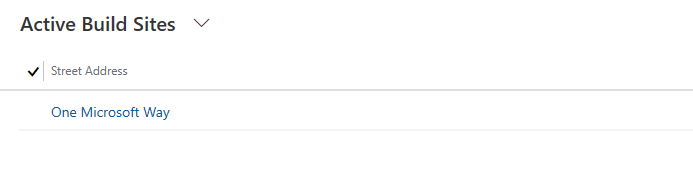
Create new Build Site record
-
Select Build Sites from the sitemap.
-
Select + New.
-
Provide the address as One Microsoft Way Redmond WA 98052 USA
-
Select Save and Close and this will show the newly created record on the Active Build Sites View.
-
-
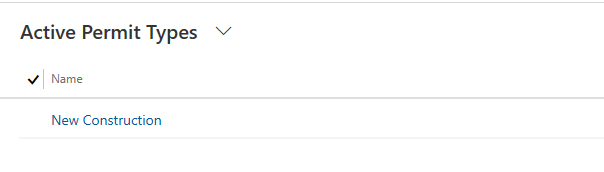
Create new Permit Type record
-
Select Permit Types from the sitemap.
-
Select + New.
-
Provide Name as New Construction and select Save and Close. This will create the record and you should be able to see it on the Active Permit Type View.
-
-
Create new Permit record
-
Select Permits from the sitemap.
-
Select + New.
-
Provide Name as Test Permit, select the Permit Type, Build Site, and the Contact records you created in the previous steps.
-
Select a future date for the Start Date and select Save.

-
-
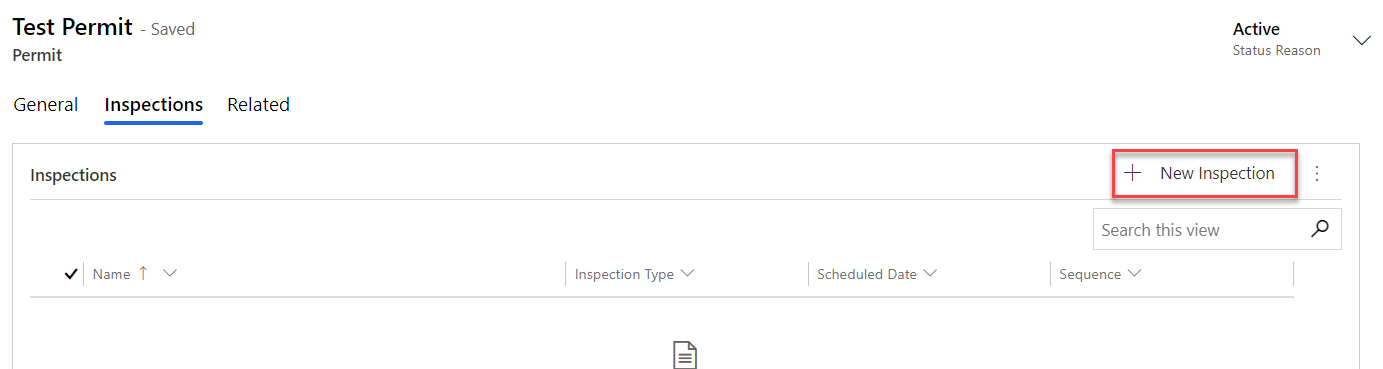
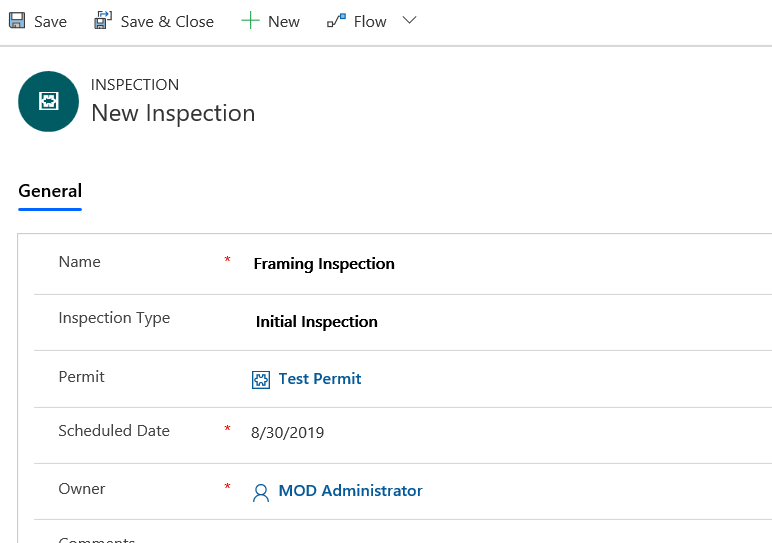
Create new Inspection record
-
Go to the Inspections tab.
-
Select + New Inspections.
-
Provide Name as Framing Inspections, select Initial Inspection from the dropdown for Inspection Type, and select future date for Scheduled Date.
-
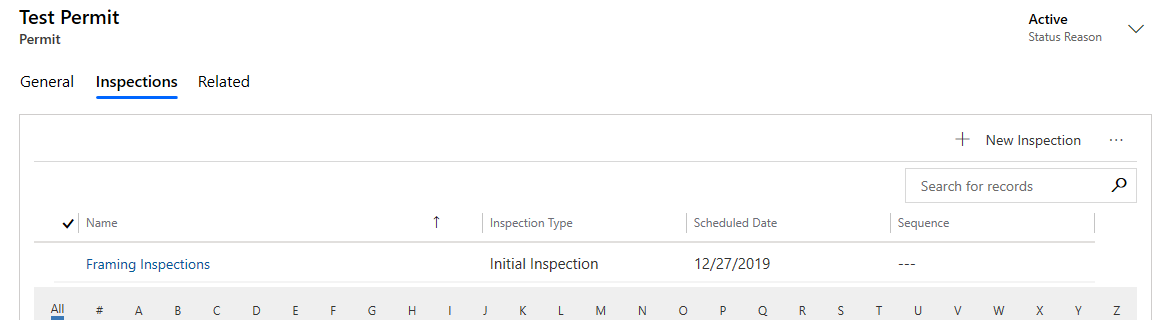
Select Save and Close.
- The Inspection record should now show on the Permit sub-grid.
-
-
You may add more test records.