NOTE
Effective November 2020:
- Common Data Service has been renamed to Microsoft Dataverse. Learn more
- Some terminology in Microsoft Dataverse has been updated. For example, entity is now table and field is now column. Learn more
Lab 04: Power Automate
In this lab, you will create Power Automate cloud flows to automate various parts of the Company 311 solution.
The following have been identified as requirements you must implement to complete the project:
-
Escalation, approval, and execution process for urgent maintenance issues
-
Notify reporting user about the issue status changes
-
How to use a business rule to implement logic.
What you will learn
-
How to design data columns (in the data model) to support automation
-
How to build a flow using Microsoft Dataverse Connector
-
How to use approvals
High-level lab steps
- Add columns to support escalation
- Build flow to approve escalation
- Build flow to notify user of status change
- Build approval as an adaptive card in Microsoft Teams
Prerequisites
- Must have completed Lab 02.1: Data model and model-driven app
- Must have completed Lab 02.2: Business Process Flows and Business Rules
Things to consider before you begin
- What is the most efficient way to identify urgent maintenance issues and escalate them
Detailed steps
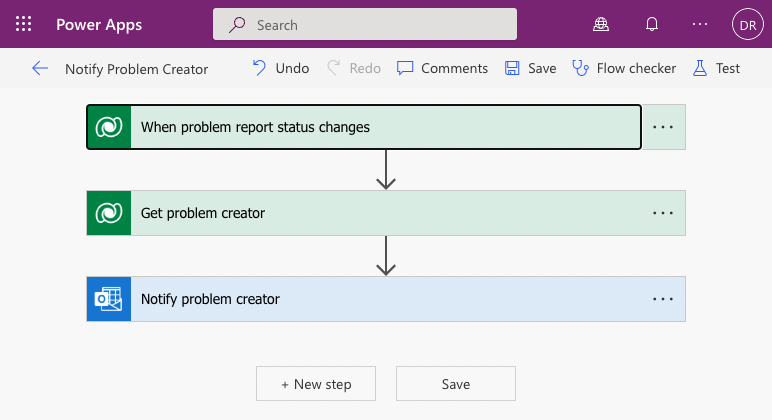
Exercise 1: Build notify flow
In this exercise, you create a flow that will notify the creator of a problem when the status changes.
Task 1: Create flow
In this task, you will create a flow that send notification when the status of problem report row changes.
-
Navigate to the Power Apps maker portal and make sure you are in the correct environment.
-
Select Solutions and click to open the Company 311 solution.
-
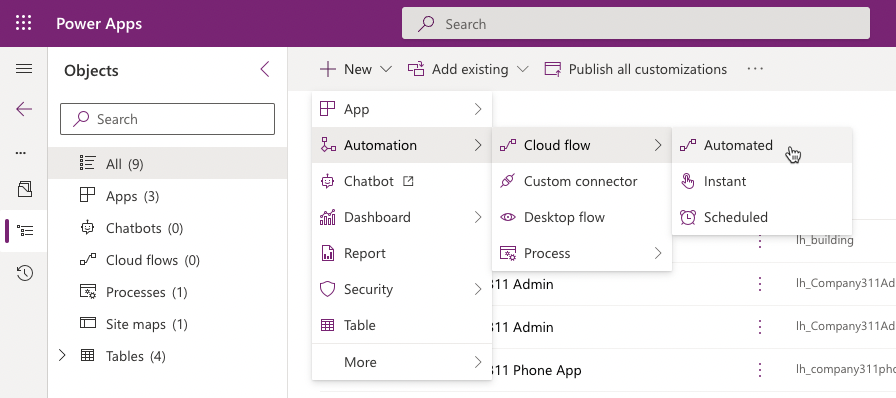
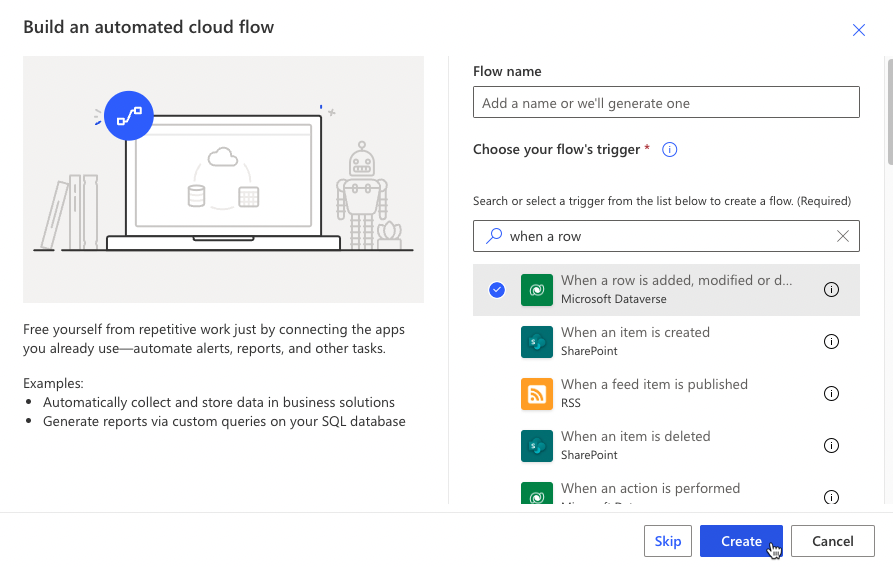
Click + New > Automation > Cloud Flow > Automated.
-
Type when a row in the search box, then locate and select When a row is added, modified or deleted from Microsoft Dataverse connector.
-
Click Create.
-
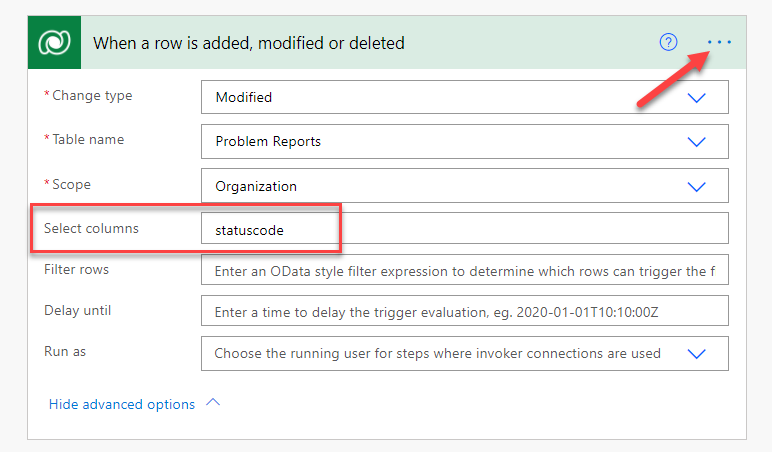
Select Modified for Change type, select Problem Reports for Table name, Organization for Scope and click Show advanced options.
-
Enter statuscode for Select columns then click … Menu button of the trigger step.
-
Select Rename.
-
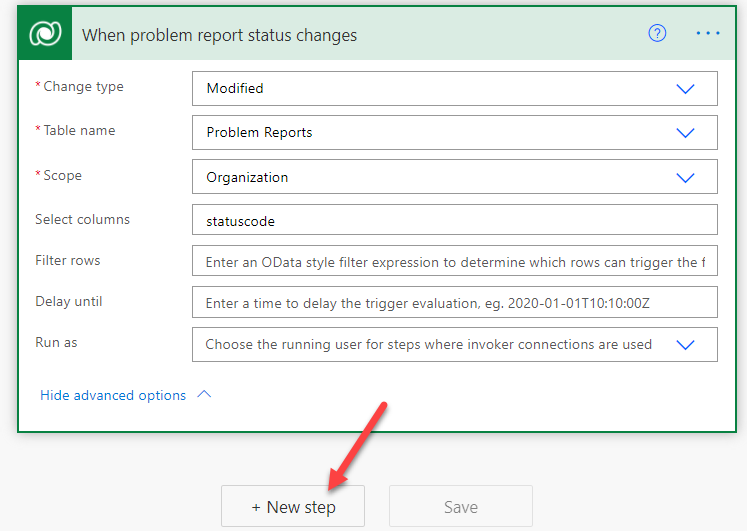
Rename the trigger step When problem report status changes.
-
Click + New step.
-
Select Connectors tab and then select Microsoft Dataverse. Select Get a row by ID.
-
Select Users for Table name.
-
Click on the Row ID field, go to the Dynamic pane, search for created and click once on Created By (Value) to add it.
-
Click Show advanced options of the new step.
-
Enter internalemailaddress for Select columns.
-
Click on the … Menu button of the new step and select Rename.
-
Rename the step Get problem creator.
-
Click + New step.
-
Search for send email and select Send an email (V2).
-
Click to select the To field and click Switch to advanced mode. Click on this button toggles show/hide of the dynamic pane.
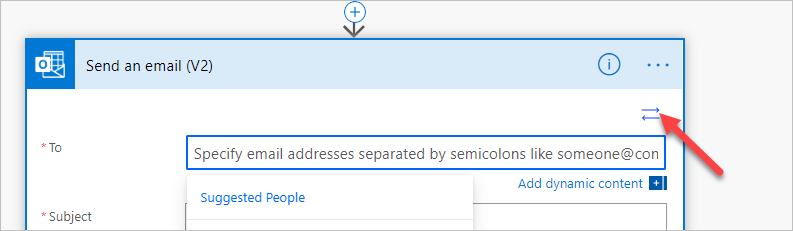
-
Select the Primary Email field from the Get problem creator step.
-
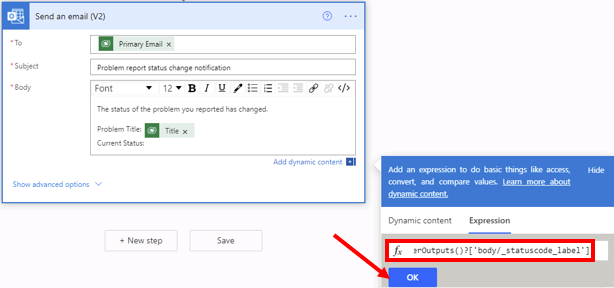
Enter Problem report status change notification for Subject.
-
Click to select the Body field.
-
Type The status of the problem you reported has changed. and press the [ENTER] key.
-
Type Problem Title: go to the Dynamic pane, search for title and select Title.
-
Press the [ENTER] key.
-
Type Current Status: go to the Dynamic pane, select the Expression tab, paste the expression below, and click OK. This expression will show the label of the choice instead of the value.
triggerOutputs()?['body/_statuscode_label']
-
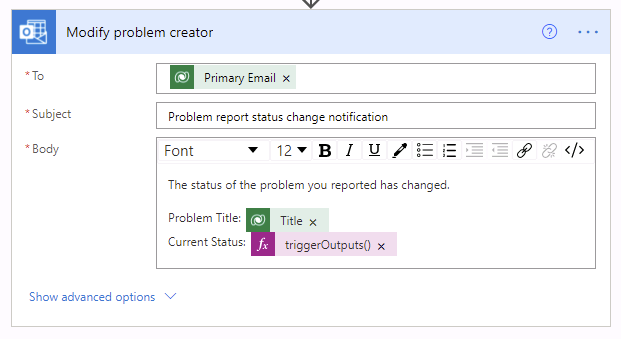
Click on the … Menu button of the new step and select Rename.
-
Rename the Notify problem creator.
-
The step should now look like the image below.
-
Scroll up change the flow name from Untitled to Notify Problem Creator.
-
Click Save and wait for the flow to be saved.
- Press <- button to go back to solution explorer.
Task 2: Test the flow
In this task, you will test the notify problem creator flow.
-
Make sure you are still on the Power Apps maker portal site and you are in the correct environment.
-
Select Apps, and then select the Company 311 Admin Model-driven application. Click Play.
-
Click + New.
-
Enter Flow test for Title, select London Paddington for building, enter This is a flow test for Details, and click Save.
-
Scroll down and change the Status Reason value to In Progress and save again.
-
Close the application browser window or tab.
-
You should now be back to the Power Apps maker portal
-
Select Solutions and click to open the Company 311 solution.
-
Locate and click to open the Notify Problem Creator flow you created.
-
You should see a succeeded flow run in the 28-day run history section. Click to open the run.
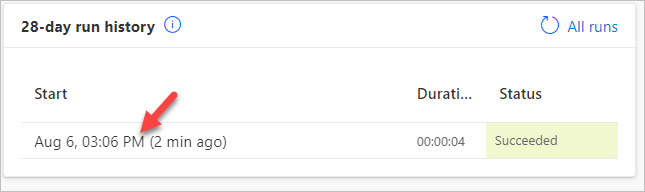
-
All the flow steps should have a green check mark.
-
Click App launcher and select Outlook.

-
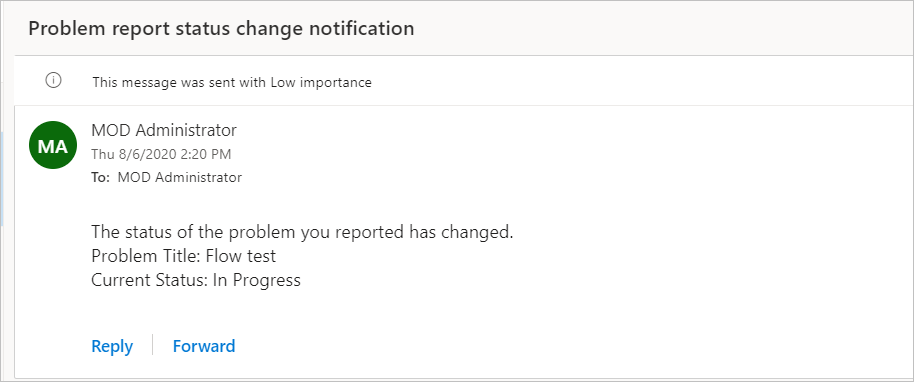
You should get an email from the flow. Click to open the email.
-
The email should look like the image below.
Exercise 2: Build escalation flow
In this exercise, you create add two new columns to the Problem Report table and create escalation flow.
Task 1: Add Columns
In this task, you add a new Columns to the Problem Report table.
- Navigate to the Power Apps maker portal and make sure you are in the correct environment.
- Select Solutions and click to open the Company 311 solution.
- Locate and click to open the Problem Report table in the tree view.
- Click + New > Column.
- Enter Estimated Cost for Display name, select Currency for Data type and click Save.
- Select the Forms in the tree view.
- Click to open the Information form of type Main.
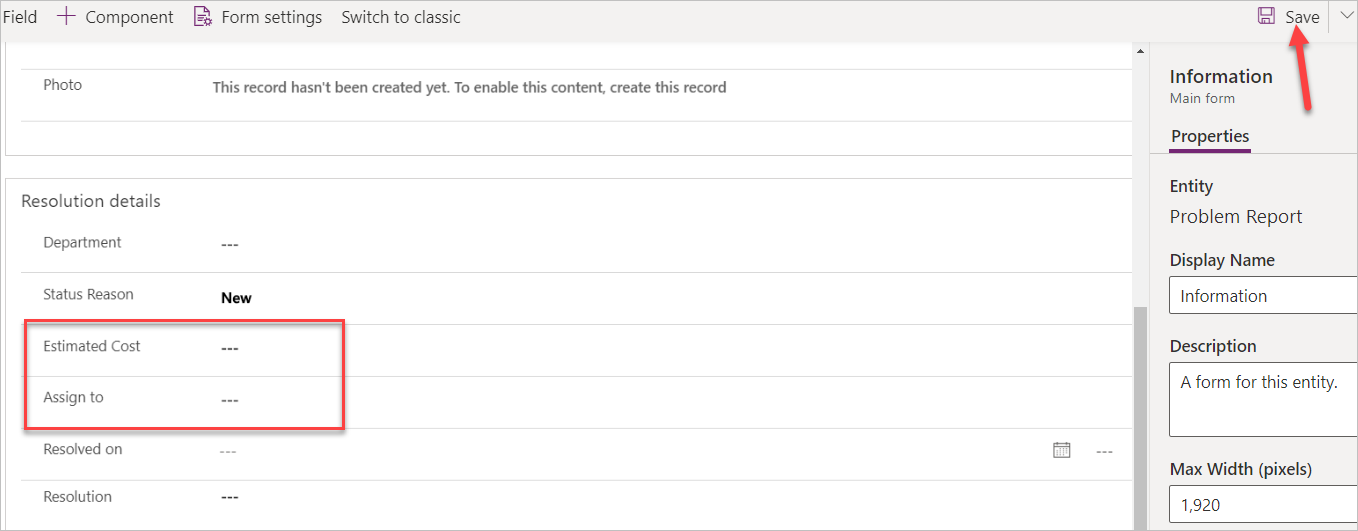
- Add Estimated Cost column to the form and place it below the Status Reason column.
- Add the Assign to column and place it below the Estimated Cost column.
- The Resolution details section of the form should now look like the image below. Click Save.
-
Click on the Back button located on the top left of the screen.
-
Select All, click Publish all customizations, and wait for the publishing to complete.
Task 2: Build escalation flow
In this task, you will create the escalation flow.
-
Navigate to the Power Apps maker portal and make sure you are in the correct environment.
-
Select Solutions and click to open the Company 311 solution.
-
Click + New > Automation > Cloud Flow > Automated.
-
Search for when a row is added and select When a row is added, modified, or deleted from Microsoft Dataverse connector then click Create.
-
Select Added or Modified for Change type, select Problem Reports for Table name, select Organization for Scope and click Show advanced options.
-
Enter lh_estimatedcost,lh_assignedto for Select columns.
-
Click on the … Menu button of the trigger step and select Rename.
-
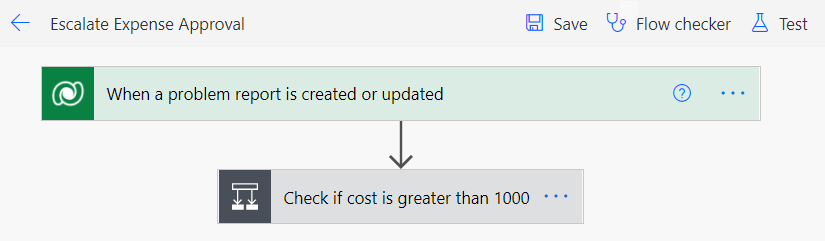
Rename the trigger step When a problem report is created or updated.
-
Click + New step.
-
Search for Condition and Select Condition control.
-
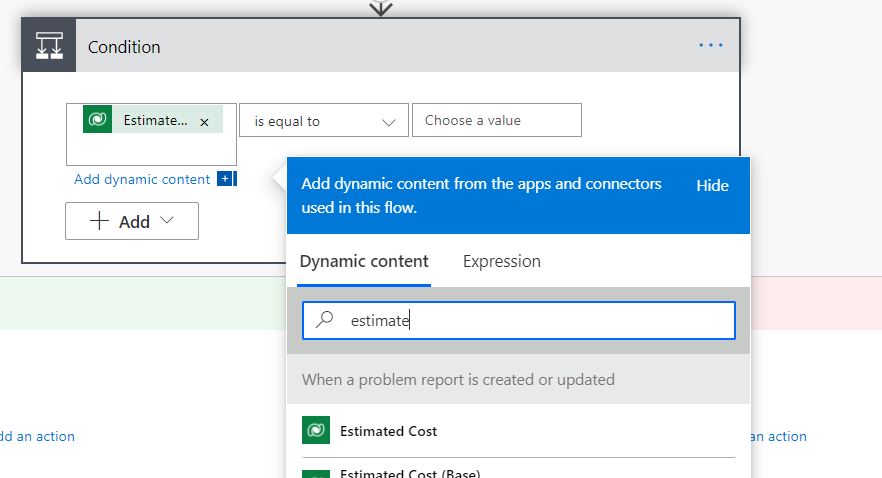
Click to select the first Choose a value field.
-
Go to the Dynamic content pane, search for estimated and select Estimated Cost.
-
Select is greater than in the second field and enter 1000 in the third field.
-
Rename the condition step to Check if cost is greater than 1000.
-
Go to the If yes branch and click Add an action.
-
Search for Get a row and select Get a row by ID from Microsoft Dataverse.
-
Select Users for Table name.
-
Click to select the Row ID field and select Assign to (Value) from the Dynamic content pane.
-
Click Show advanced options.
-
Enter internalemailaddress for Select columns.
-
Rename the Get a Row by ID step Get user.
-
Click Add an action.
-
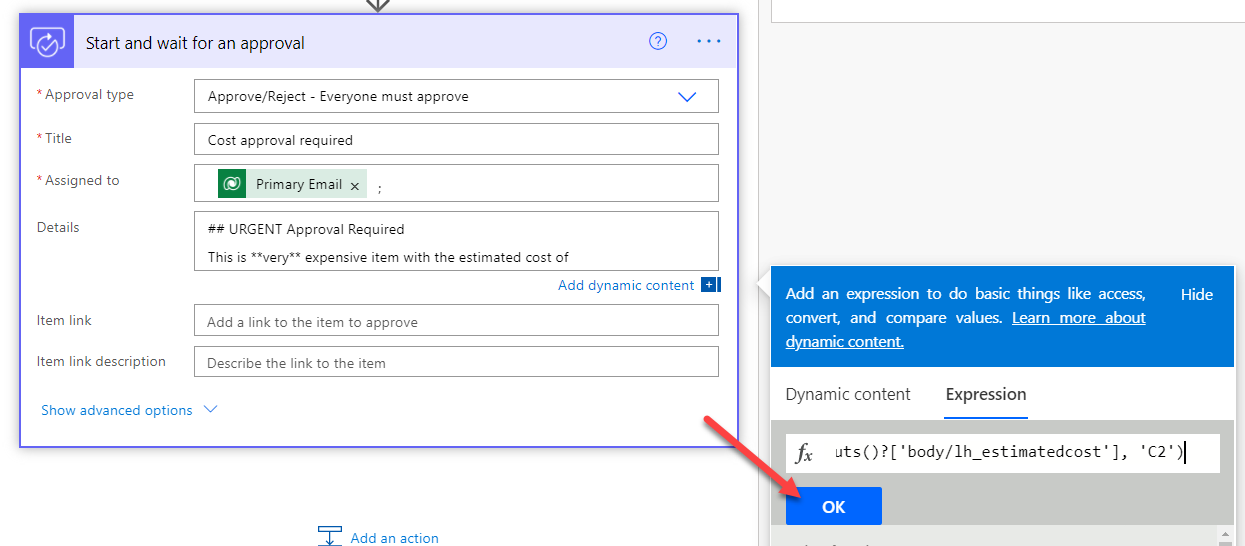
Search for approval and select Start and wait for an approval.
-
Select Approve/Reject - Everyone must approve for Approval type.
-
Enter Cost approval required for Title.
-
Click to select the Assigned to field.
-
Go to the Dynamic content pane and select Primary Email from the Get user step.
-
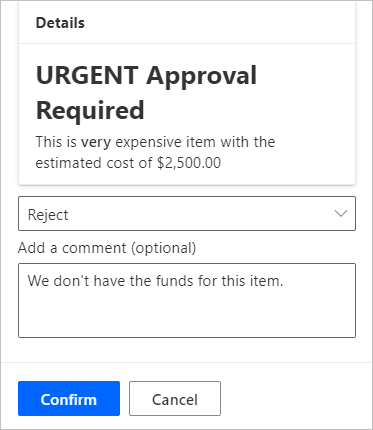
Paste the markdown text below in the Details field.
## URGENT Approval Required
This is **very** expensive item with the estimated cost of
- Place your cursor after cost of, go to the Dynamic content pave, select the Expression tab, paste the expression below, and click OK.
formatNumber(triggerOutputs()?['body/lh_estimatedcost'], 'C2')
-
Click Add an action.
-
Search for condition and select Condition control.
-
Click to select the first Choose a value field.
-
Go to the Dynamic content pane, search for Outcome and select Outcome.
-
Select equals to in the second field and type Reject for value in the third field.
- Go to the If yes branch and click Add an action.
-
Search for update a Row and select Update a Row from Microsoft Dataverse.
-
Select Problem Reports for Table name.
-
Click to select the Row ID field.
-
Go to the Dynamic content pane, search for problem report and select Problem Report.
-
Click Show advanced options.
-
Click to select the Resolution field, go to the Dynamic content pane and select Response summary.
-
Select Won’t fix for Status Reason.
-
Rename the step Update problem report.
-
Scroll up and rename the flow Escalate Expense Approval.
- Click Save.
-
Close the flow designer browser window or tab.
-
Click Done on the popup.
Task 3: Test flow
In this task, you will test the escalation flow
-
Navigate to the Power Apps maker portal and make sure you are in the correct environment.
-
Select Apps and click to open the Company 311 Admin application.
-
Click to open one of the Problem Report rows.
-
Scroll down, enter 2500 for Estimated Cost, assign it to yourself (for test purposes) and click Save.
-
Navigate to Power Automate
-
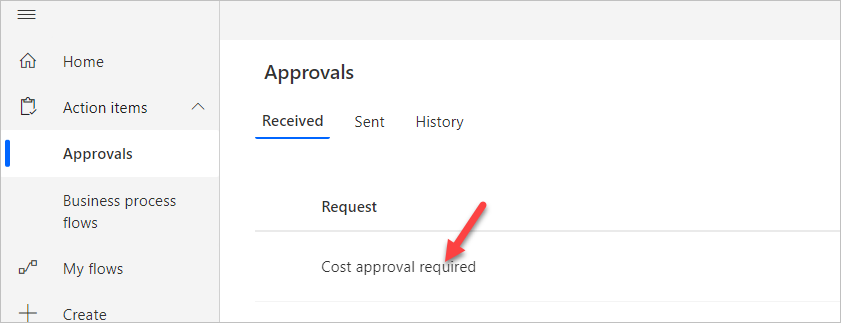
Select Approvals.
-
You should see at least one approval in the received tab. Click to open the approval. It can take around 10-15 minutes for approvals to show up here on the first run.
- Select Reject, enter We don’t have the funds for this item for comment, and click Confirm.
-
Go back to the Company 311 Admin application.
-
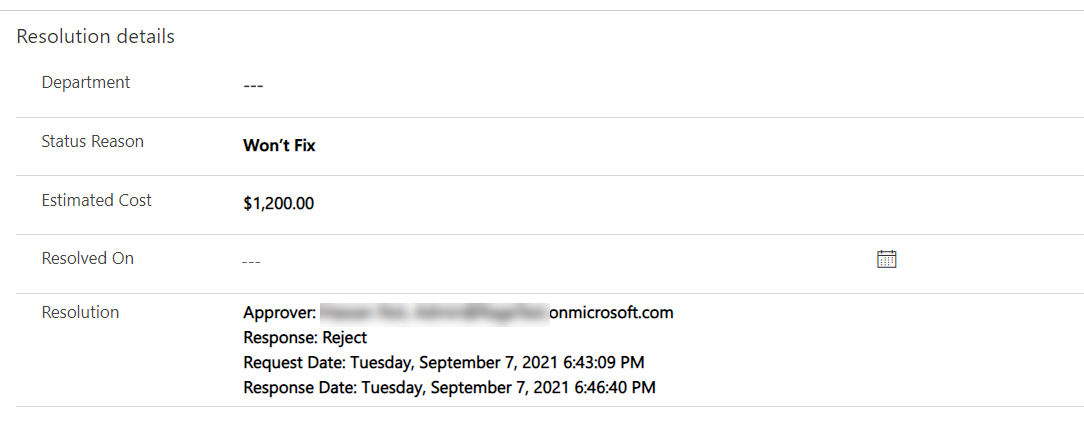
Change the view to My Reports and click to open the same row you change the estimated cost.
-
The Status Reason should be set to Won’t fix and the Resolution should contain the details of Approver, Response, Request Date and Response Date.
-
Click Save, if you have not done so previously.

Exercise 3: Send approval requests as adaptive card in Microsoft Teams
In this exercise, you will setup a team in Microsoft Teams dedicated to the Company 311 applications. You will modify the flow to send the approval request as an adaptive card in Teams chat instead of an approval message.
- Task 1: Setup Company 311 Team
- Task 2: Modify flow to send adaptive card in Teams chat
- Task 3: Test adaptive card
Task 1: Setup Company 311 Team
In this task you will setup a Microsoft Teams team for the Lamna Healthcare Company, if you have not done so in previous exercises.
Note: If you have already created the Company 311 Teams in the Microsoft teams, skip this part and continue to the next task.
-
Navigate to Microsoft Teams and sign in with the same credentials you have been using previously.
-
Select Use the web app instead on the welcome screen.
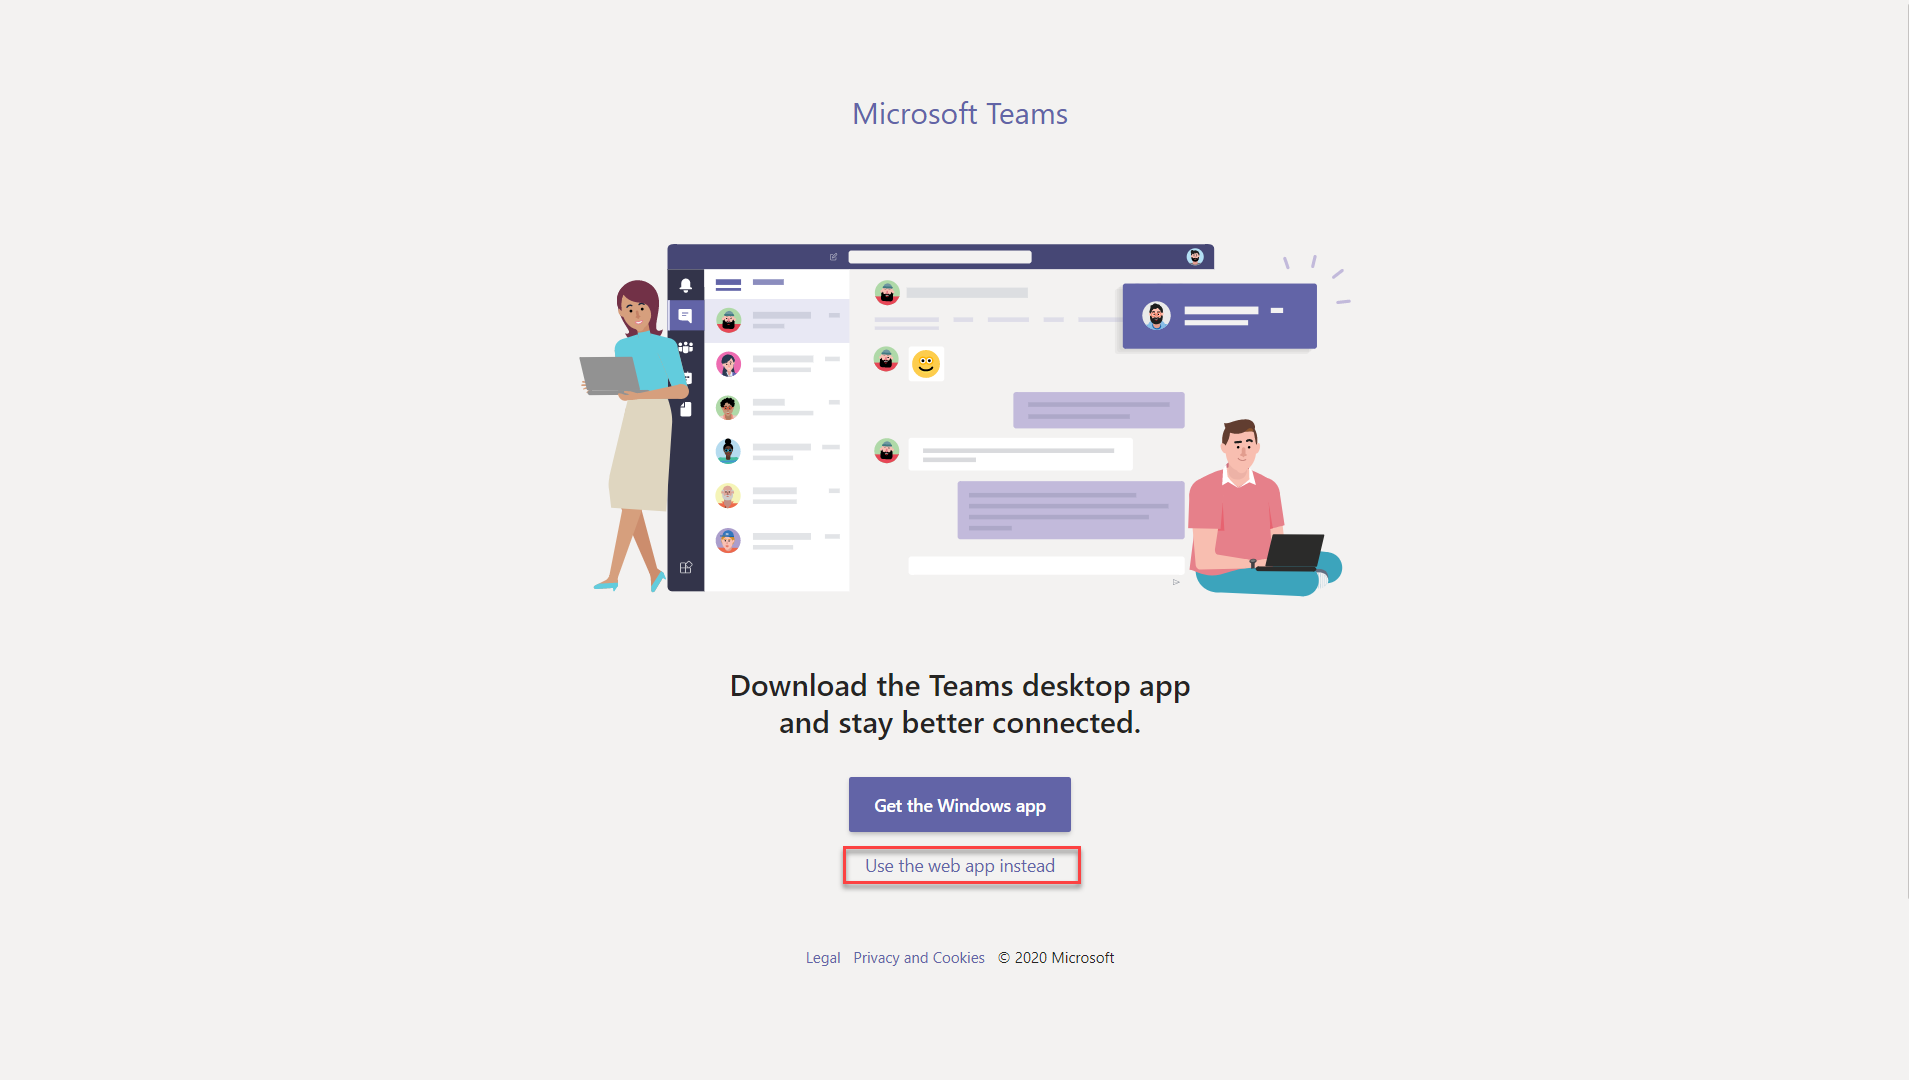
-
When the Microsoft Teams window opens, dismiss the welcome messages.
-
On the bottom left corner, choose Join or create a team.
-
Select Create a team.
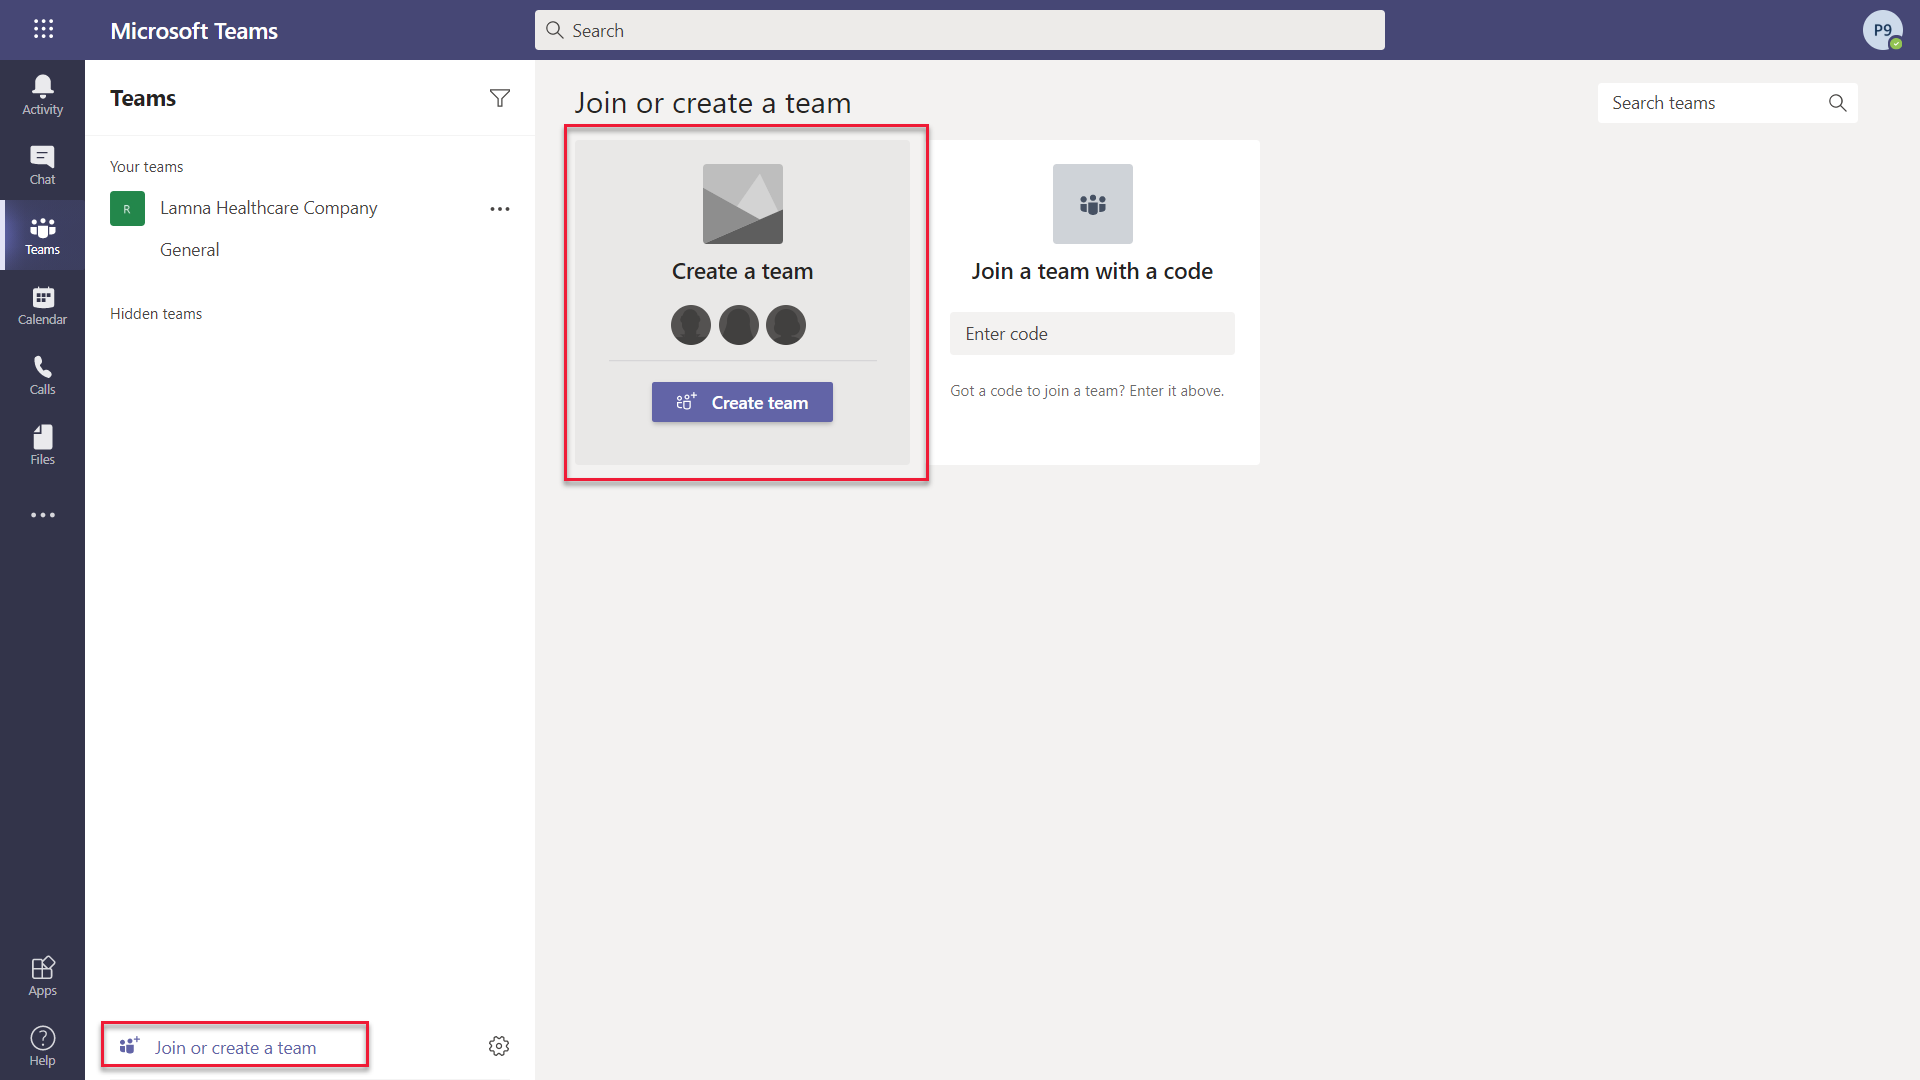
-
Press From scratch.
-
Select Public.
-
For the Team name choose Company 311 and select Create.
-
Select Skip adding members to Company 311.
Task 2: Modify flow to send adaptive card in Teams chat
In this task you will replace the approval sent by email with the adaptive card.
- Locate Start and wait for an approval step created earlier in Exercise 2, Task 2. (Navigate to the Power Apps maker portal and make sure you are in the correct environment. Solutions > Company 311 Solution > Flows > Escalate Expense Approval)
- Select … then select Delete.
- Click + between the steps to insert a new step then select Add an action.
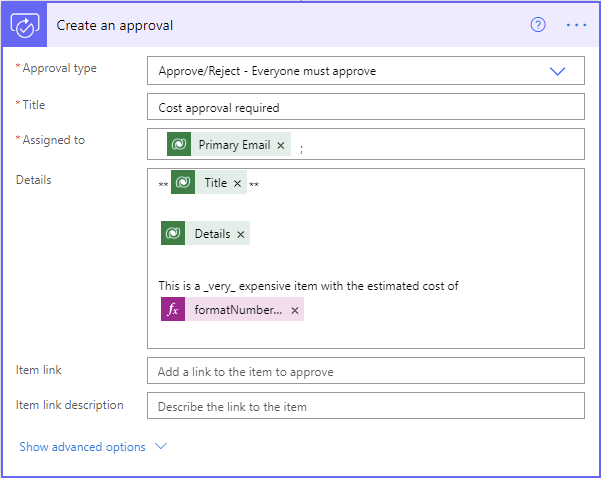
- Search for approval and select Create an approval.
- Select Approve/Reject - Everyone must approve for Approval type.
- Enter Cost approval required for Title.
- Click to select the Assigned to field.
- Go to the Dynamic content pane and select Primary Email from the Get user step.
- Paste the markdown text below in the Details field.
**{title}**
{details}
This is a _very_ expensive item with the estimated cost of
-
Select {title} placeholder, go to the Dynamic content pane, locate and select Title field from When a problem report is created or updated step.
-
Select {details} placeholder, go to the Dynamic content pane, locate and select Details field from When a problem report is created or updated step.
-
Place your cursor after cost of , go to the Dynamic content pane, select the Expression tab, paste the expression below, and click OK.
formatNumber(triggerOutputs()?['body/lh_estimatedcost'], 'C2')
- Your step should look like the following:
-
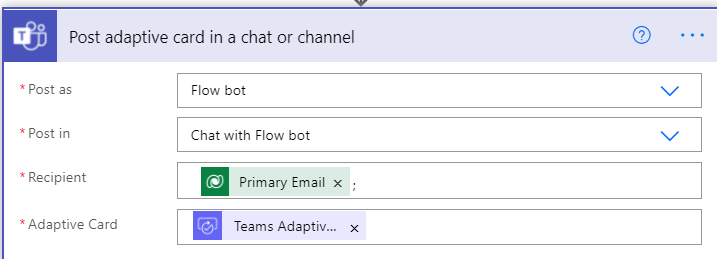
Click + then select Add an action.
-
Search for teams and select Post adaptive card in a chat or channel action.
- Select Flow bot for Post as and select Chat with Flow bot for Post in.
-
Click to select the Recipient field.
-
Go to the Dynamic content pane and select Primary Email from the Get user step.
-
Click to select Adaptive Card field.
- Go to the Dynamic content pane and select Teams Adaptive Card from the Create an approval step.
- Post adaptive card in chat or channel should look like the image below.
-
Select + then select Add an action.
-
Search for approval and select Wait for an approval action.
-
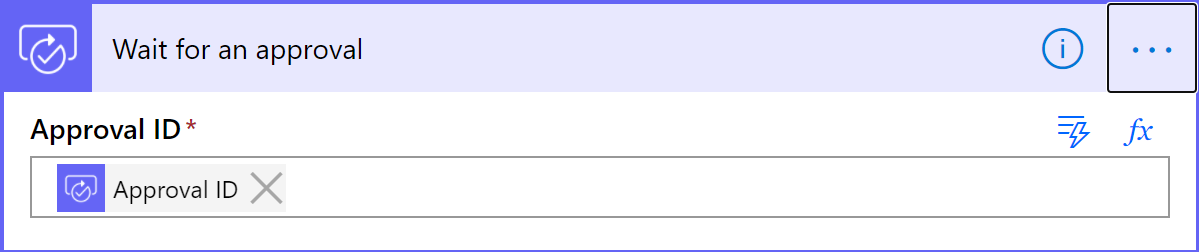
Select Approval ID field.
-
Go to the Dynamic content pane and select Approval ID from the Create an approval step.
-
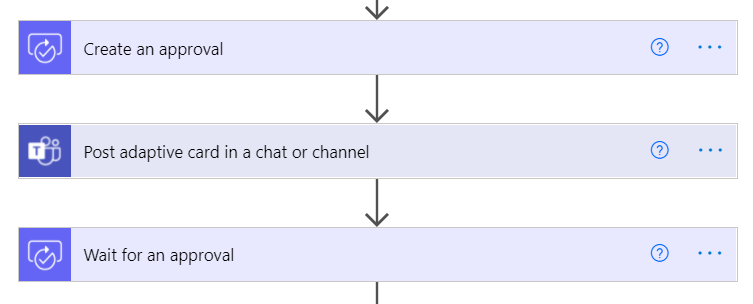
You now have replaced Start and wait for an approval step with the following:
- Expand Condition 2 step. The left side of the condition should be empty because it was referring the step which is now removed.
- Go to the Dynamic content pane, search for outcome, and select Outcome from Wait for an approval step.
- Locate Update problem report step under If yes branch.
- Click Show advanced options.
- Click to select the Resolution field, go to the Dynamic content pane, and select Response summary from Wait for an approval step.
- Click Save.
- Close the flow designer browser window or tab.
- Click Done on the popup.
Task 3: Test flow
In this task, you will test the escalation flow with the Teams and adaptive cards.
-
Navigate to the Power Apps maker portal and make sure you are in the correct environment.
-
Select Apps and click to open the Company 311 Admin application.
-
Click to open one of the Problem Report Rows.
-
Scroll down, enter any amount greater than 1000 for Estimated Cost, assign it to yourself (for test purposes) and click Save.
-
Navigate to Microsoft Teams
-
Select Chat.
-
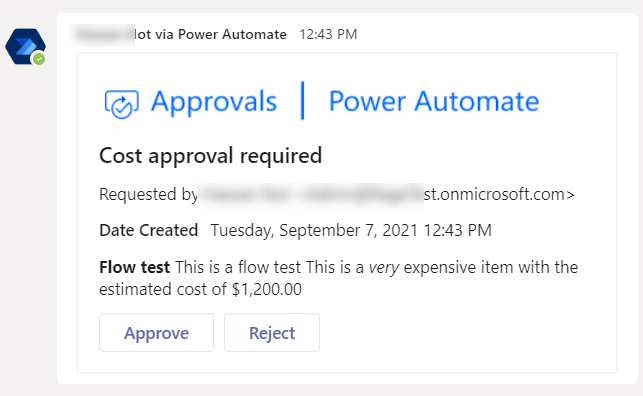
You should see the Cost Approval Required Adaptive Card.
-
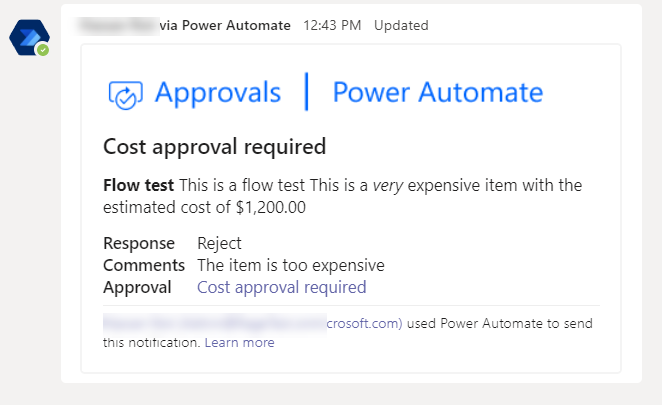
Press Reject button and enter a comment of your choice in the Comments area, for example The item is too expensive.
-
Select Submit. The card will become read-only.
-
Go back to the Company 311 Admin application.
-
Change the view to My Reports and click to open the same Row you change the estimated cost.
-
The Status Reason should be set to Won’t fix and the Resolution should contain the details of Approver, Response, Request Date and Response Date.
Discussion
- Would creating a bool field for Approved/Rejected be better?
- What are the pros and cons of using Microsoft Teams over regular email?
Bonus exercises
- Add ability for the users to subscribe to the reported problems and only notify if there is a subscription.
- Auto-subscribe creator of the problem report.
- How to find out previous value of status reason?
- Create your own adaptive card using Adaptive Cards Designer.