Extend Microsoft 365 with office add-ins

Introduction to Office client customization with add-ins
- Explain how Office add-ins extend and customize Office applications
- Describe the development tooling, APIs, and deployment of Office add-ins
- Understand how to incorporate data with Microsoft Graph and extend Office applications with add-ins using the Office UI Fabric
1. Understand Office add-ins fundamentals
1.1. Understand task pane and content add-ins
1.1.1. Task pane add-ins
Task pane add-ins allow user interaction through a panel displayed within an Office application. Through the task pane interface, you can enable the user to modify documents or emails, view data from a data source, and more. In the following image, the task pane is the panel that’s displayed to the right of the document.

In newer versions of Word, Excel, and PowerPoint, you can configure the task pane to be displayed automatically when a user opens a file. The user will need to have your add-in installed first to activate this behavior.
add-in’s manifest file defines the settings and capabilities of the add-in.
To configure an add-in as a task pane add-in for any Office application except Outlook, set the xsi:type attribute to TaskPaneApp within the OfficeApp element of the manifest file, as shown in the following example.
| |
To configure an add-in for Outlook, set the xsi:type attribute to MailApp within the OfficeApp element of the manifest file, as shown in the following example.
| |
1.1.2. Content add-ins
Content add-ins can be used to insert an object into an Excel spreadsheet or PowerPoint presentation. That object can be a web-based data visualization, media, or other external content. In the following image, the content add-in is displayed near the center of the document.

To configure an add-in as a content add-in, set the xsi:type attribute to ContentApp within the OfficeApp element of the manifest file, as shown in the following example.
| |
1.2. Understand Office add-ins dialogs
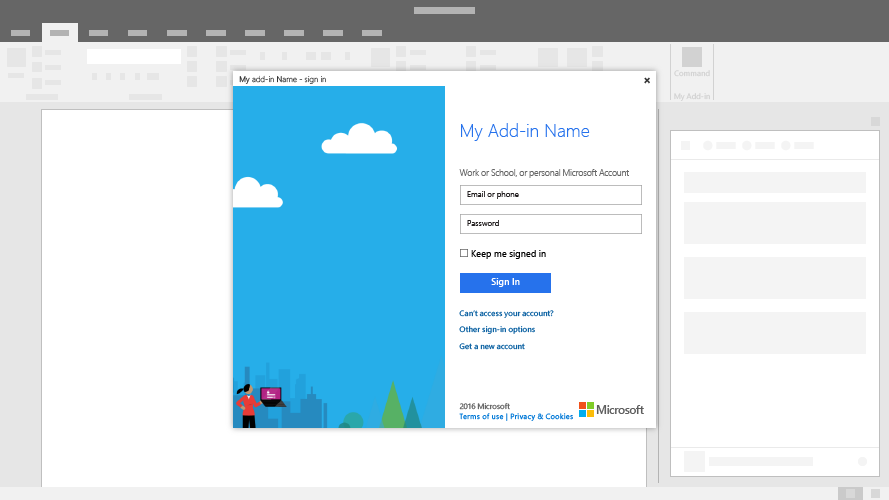
- Sign into an integrated service (for example, authenticate with Microsoft Account, Google, or Facebook).
- Confirm the user’s action.
- Run a task that might be too confined in a task pane (for example, view a video).
1.3. Understand Office add-ins custom functions
Office add-ins enable you to create custom JavaScript or TypeScript functions that can be accessed like built-in Excel functions such as SUM().
The following image shows a custom function called SPHEREVOLUME being entered in Excel.
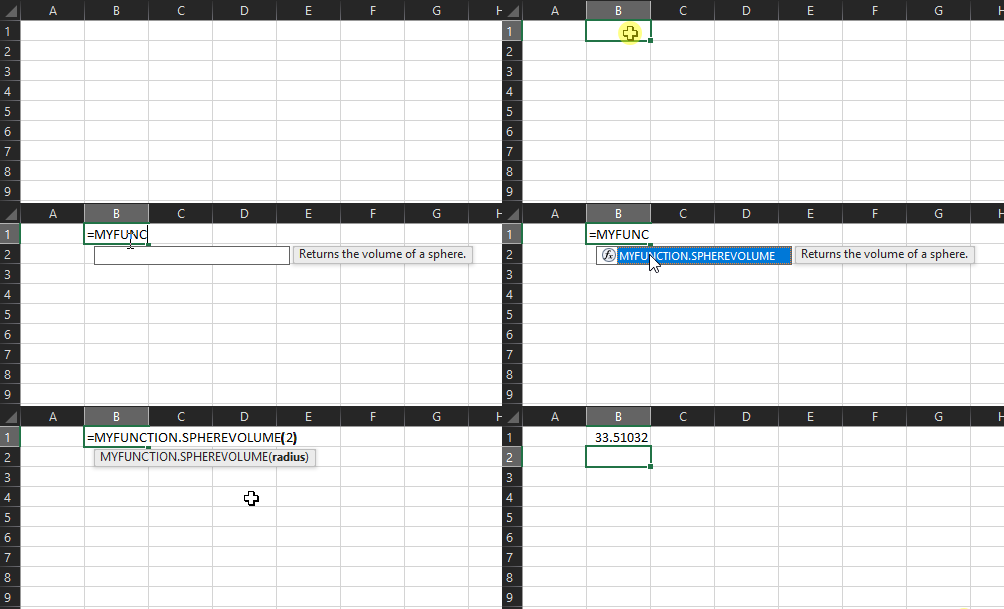
The following code sample shows the JavaScript code for the SPHEREVOLUME() function shown previously.
| |
1.3.1. Where can you use custom functions?
Custom functions are available in Excel on the following platforms.
- Windows (connected to an Office 365 subscription)
- Mac (connected to an Office 365 subscription)
- Web browser
1.3.2. Define the custom function add-in type
To configure an add-in to contain custom functions, the key settings in the manifest are as follows for Excel add-ins.
| |
1.4. Understand add-in commands
Add-in commands are UI elements that extend the Office UI and start actions in your add-in (button on the ribbon or an item to a context menu).
1.4.1. Add-in commands in Excel, Word, PowerPoint, and OneNote
You can configure an add-in so that a user can run it by selecting:
- Office application’s ribbon or command overflow menu button
- Key manifest setting:
<ExtensionPoint xsi:type="PrimaryCommandSurface">
- Key manifest setting:
- Context menu item
- Key manifest setting:
<ExtensionPoint xsi:type="ContextMenu">
- Key manifest setting:
An add-in command can also open a submenu with additional commands.
Note: Content add-ins don’t currently support add-in commands.
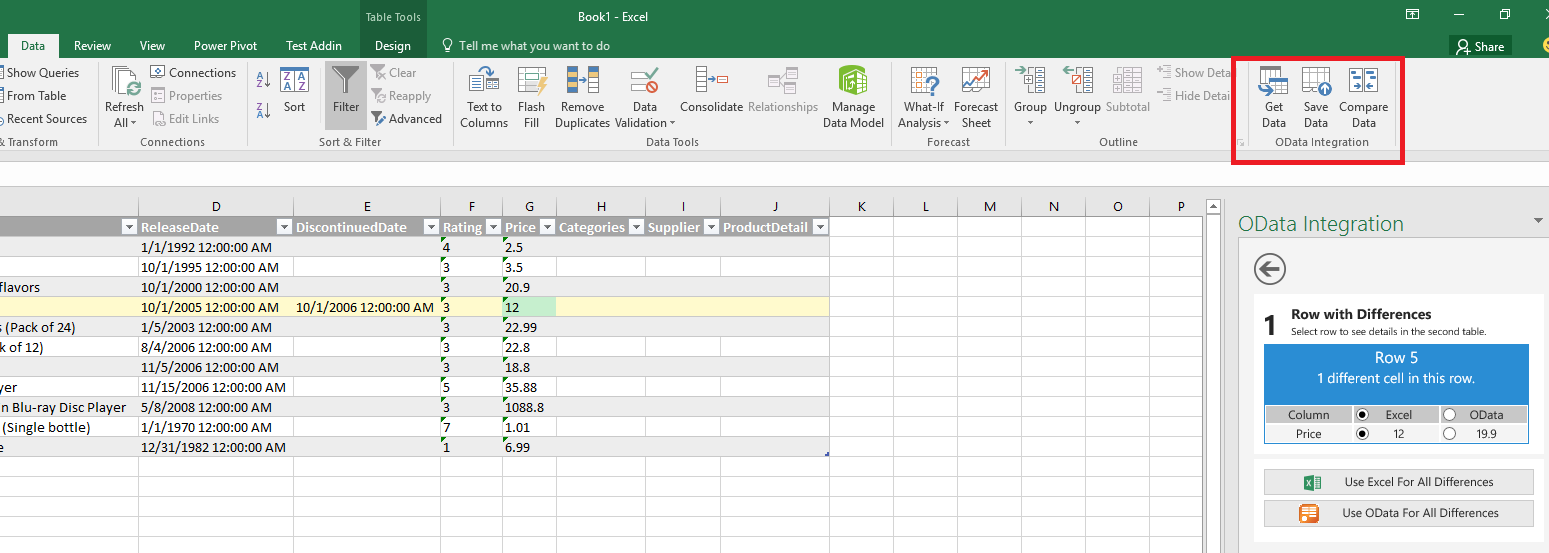
The following image shows three add-in commands (custom buttons) added to the Data tab of the Excel ribbon.
1.4.2. Add-in commands in Outlook
You can configure an add-in so that a user can run it by selecting a button in the Office ribbon or command overflow menu when the user is:
- Reading a message in the reading pane or in a pop-out window.
- Key manifest setting:
<ExtensionPoint xsi:type="MessageReadCommandSurface">.
- Key manifest setting:
- Composing a message.
- Key manifest setting:
<ExtensionPoint xsi:type="MessageComposeCommandSurface">.
- Key manifest setting:
- Creating or viewing an appointment or meeting as the organizer.
- Key manifest setting:
<ExtensionPoint xsi:type="AppointmentOrganizerCommandSurface">.
- Key manifest setting:
- Viewing a meeting as an attendee.
- Key manifest setting:
<ExtensionPoint xsi:type="AppointmentAttendeeCommandSurface">.
- Key manifest setting:
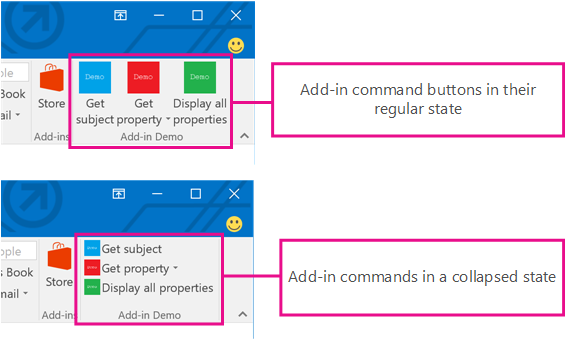
The following images show three add-in commands (custom buttons) added to the ribbon in Outlook. In the first image, the buttons are rendered in a regular state; in the second image, the buttons are rendered in a collapsed state.
1.4.3. Where can you use add-in commands?
Add-in commands are available in Excel, Outlook, OneNote, PowerPoint, and Word as shown in the following table.
| Platform | Major Office version | Subscription or one-time purchase? | Notes |
|---|---|---|---|
| Windows | Not applicable | connected to Office 365 subscription | Not available in OneNote |
| 2019 | one-time purchase | Not available in OneNote | |
| 2016 | one-time purchase | Only available in Outlook on Exchange 2016 (requires post-release update) or later. Not available in Office other applications. | |
| 2013 | one-time purchase | Only available in Outlook on Exchange 2016 or later. Requires post-release updates for Outlook and Exchange 2016. Not available in other Office applications. | |
| Mac | Not applicable | connected to Office 365 subscription | Not available in OneNote |
| 2019 | one-time purchase | Not available in OneNote | |
| 2016 | one-time purchase | Not available in OneNote | |
| iOS | Not applicable | connected to Office 365 subscription | Only available in Outlook |
| Android | Not applicable | connected to Office 365 subscription | Only available in Outlook |
| web browser | Not applicable | Not applicable | Available in all supported Office applications |
1.5. Understand the purpose of the add-in manifest
An Office add-in’s XML manifest file defines the settings and capabilities of the add-in. You can configure it to control how your add-in is rendered and behaves in the targeted Office applications.
1.5.1. What the manifest defines
- Add-in metadata (for example, ID, version, description, display name, default locale)
- Information about how the add-in integrates with Office (for example, target applications, custom functionality, add-in commands)
- Location of images the add-in should use for branding and command iconography
- Permissions that the add-in requires
- Dimensions of the add-in (for example, default dimensions for content add-ins, requested height for Outlook add-ins)
- Rules that specify when the add-in should activate in a message or appointment (Outlook only)
1.5.2. How the manifest is used
- The Office applications where your add-in runs use information from the manifest to render add-in UI and wire up custom buttons or menu entries.
- If you publish your add-in to AppSource:
- Information from the manifest (name, description, author, logo, and so on) is used to create the app entry that’s displayed to potential customers in AppSource.
- The AppSource validation process reads information from the manifest and validates that your add-in runs on expected platforms.
2. Understand Office JavaScript APIs
In this unit, you’ll explore the Office add-ins programming model, developer tools, and the capabilities of the Office JavaScript APIs for Excel, Outlook, and Word.
2.1. Understand the Office add-ins programming model
The Office add-in programming model relies on two JavaScript object models:
- Host-specific JavaScript API - Host-specific APIs for Excel and Word provide strongly-typed objects that you can use to access specific elements in the host application. For example, the Excel API contains objects that represent worksheets, ranges, tables, charts, and more.
- Common API - Introduced with Office 2013, the Common API enables you to access features such as:
- UI
- Dialogs
- Client settings that are common across multiple types of Office applications
Custom functions use a slightly different programming model and will be covered in a later unit.
2.1.1. Office JavaScript API requirement sets
Depending on the version of Office and platform it runs on, there are different APIs and features supported for your add-in. For example, Office 2016 supports more capabilities than Office 2013. To handle this situation, we provide requirement sets to help you determine whether an Office host supports the capabilities you need in your Office add-in.
Requirement sets can be specific to Office hosts, such as an ExcelApi 1.7 set, or common to multiple hosts, such as the Dialog API. Requirement set support varies by Office host and host version.
It’s possible to programmatically check if requirement sets are supported by your add-in’s Office host, using isSetSupported.
| |
2.1.2. Using Office JavaScript APIs
To use these APIs, reference them on the Office.js content delivery network (CDN), typically by adding one of the following code statements to your page’s <head> tag.
| |
Along with adding your preferred CDN link, all Office add-ins require an Office.onReady() call. You put your add-in code in this method, and it gets called once the Office.js library has initialized. Inside the onReady() method, you can determine which host your add-in is running in by checking the Office.HostType enum value (for example, Excel or Word). You can check which platform your add-in is running on with an Office.PlatformType enum value (for example, PC or Mac).
If you’re using additional JavaScript frameworks that include their own initialization handler or tests, they should be placed within the response to Office.onReady(). For example, you would reference JQuery’s $(document).ready() function as shown in the following code example.
| |
2.1.3. Making asynchronous calls using proxy objects
When you work with a document, requested read or write actions are batched up using a proxy object. Your API calls don’t actually read or update the underlying document until you call the sync() method.
For better security, your add-in runs in a sandboxed JavaScript environment that can’t directly access the document, or other add-ins. The Office add-ins platform provides a RequestContext object that in turn provides proxy objects to represent the document (such as worksheets, ranges, and tables). The RequestContext is typically passed to your code as a parameter named context. You can use the context object to get any proxy objects you need to work with the document.
Before you can read the properties of a proxy object, you must load the properties to populate the proxy object with data from the Office document. You do this by calling the load() method on the proxy object for any properties you need. Then call the context.sync() method, which will load all of the requested properties. For example, if you create a proxy range object to work with a user-selected range in an Excel worksheet, and then want to read the selected range’s address property, you need to load the address property before you can read it. To request properties of a proxy object to be loaded, call the load() method on the object and specify the properties to load.
The following example shows a function that defines a local proxy object (selectedRange), loads the address property of that object, then calls context.sync(). When the promise from context.sync() is resolved, the code can then read the address property. Excel.run is required for this specific host, to load properties that affect platform behavior when the function runs. Not all hosts contain a run call.
| |
2.2. Understand Office add-ins developer tools
- Yeoman generator for Office add-ins
- Visual Studio
- Script Lab
- Manifest validator
2.2.1. Yeoman generator for Office add-ins
You can create an Office add-in by using the Yeoman generator for Office add-ins or Visual Studio. The Yeoman generator for Office add-ins can be used to create a Node.js Office add-in project that can be managed with Visual Studio Code or any other editor. You can choose to create the project using HTML, CSS, and JavaScript, or using Angular or React. TypeScript is also an option.
To create an Office add-in project with the Yeoman generator, complete the following steps.
- To globally install Yeoman and the Yeoman generator for Office add-ins using npm, the Node package manager, run the following command.
npm install -g yo generator-office
- To create an add-in project using the Yeoman generator, run the following command.
yo office
2.2.2. Visual Studio
Visual Studio can be used to create Office add-ins for Excel, Word, PowerPoint, or Outlook. An Office add-in project gets created as part of a Visual Studio solution, which means you can use Visual Studio features like selecting Start or choosing F5 to automatically run your add-in locally on IIS. Office add-in projects that you create with Visual Studio use HTML, CSS, and JavaScript.
2.2.3. Explore the APIs using Script Lab
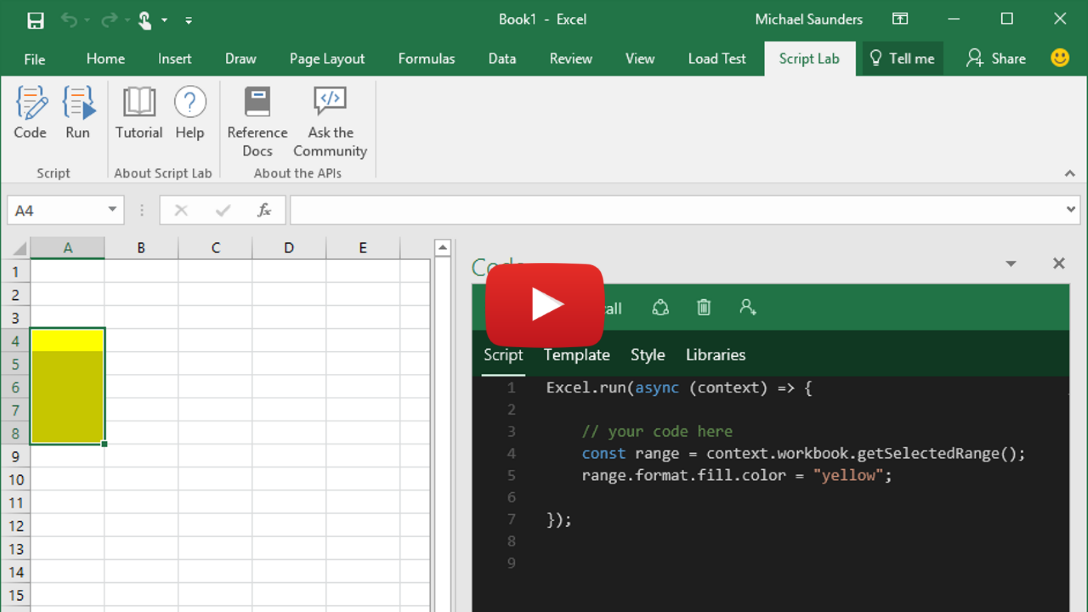
Script Lab is an add-in that enables you to run Office JavaScript snippets while you’re working in an Office program such as Excel or Word. It’s available for free via AppSource. In Script Lab, you can access a library of built-in samples to quickly try out APIs or even use a sample as the starting point for your own code.
2.2.4. Validating an Office add-in’s manifest file
The Office add-ins manifest validator examines your add-in’s manifest file to determine if it’s correct and complete. If you created your add-in project using the Yeoman generator for Office add-ins (version 1.1.17 or later), you can validate the manifest by running the following command in the root directory of the project.
npm run validate
If you didn’t use the Yeoman generator to create your add-in project, you can validate your add-in’s manifest by completing the following steps.
- Install Node.js.
- Run the following command in the root directory of your project.
npx office-addin-manifest validate {{MANIFEST_FILE}}
2.3. Understand the capabilities of the Excel JavaScript API
2.4. Understand the capabilities of the Outlook JavaScript API
The Outlook JavaScript APIs give your add-ins access to the user’s mailbox, messages, and appointments in Outlook. An Outlook add-in can get the content and properties of a message or appointment. An add-in can also manage the content, formatting, and structure of a message or appointment that is being composed.
2.4.1. Object model
To understand the Outlook APIs, first see how the main components of a mailbox relate to each other.
- The Mailbox object enables you to handle authentication, manage a selected item, and view user profile details.
- The Item object represents the selected message or appointment that the user is reading or composing.
Using the Outlook APIs, you can manage many properties of an email or appointment. Many of the APIs are organized around the mode the user is in. The following table maps item types and modes.
| Item type | Modes |
|---|---|
| Message | Read Compose |
| Appointment/meeting | Attendee (read) Organizer (compose) |
2.4.2. Key features
2.4.2.1. Authentication
Your Outlook add-in can access information from anywhere on the Internet. A few examples include the server that hosts the add-in, your internal network, or elsewhere in the cloud. If that information is protected, your add-in needs a way to authenticate your user. Outlook add-ins provide a number of different methods to authenticate, depending on your specific scenario.
| Access token | Use if your add-in… |
|---|---|
| Exchange user identity tokens | Is used primarily by Exchange on-premises users. Needs access to a non-Microsoft service that you control. |
| OAuth2 access tokens | Needs access to a third-party service outside of your control. |
| Callback tokens | Needs access to the user’s mailbox from your server. |
2.4.2.2. Contextual add-ins
Contextual add-ins are Outlook add-ins that activate based on text in a message or appointment. You may have seen the default contextual add-ins in Outlook, such as Bing Maps or Suggested Meetings. Using contextual add-ins, a user can initiate tasks related to a message without leaving the message itself, which results in an easier and richer user experience.
| User chooses… | Contextual add-in action |
|---|---|
| Address | Open a map of the location. |
| String | Open a meeting suggestion add-in. |
| Phone number | Add number to your contacts. |
Contextual add-ins are not currently available in Outlook on Android and iOS at this time.
The following image shows a contextual add-in displayed in Outlook.
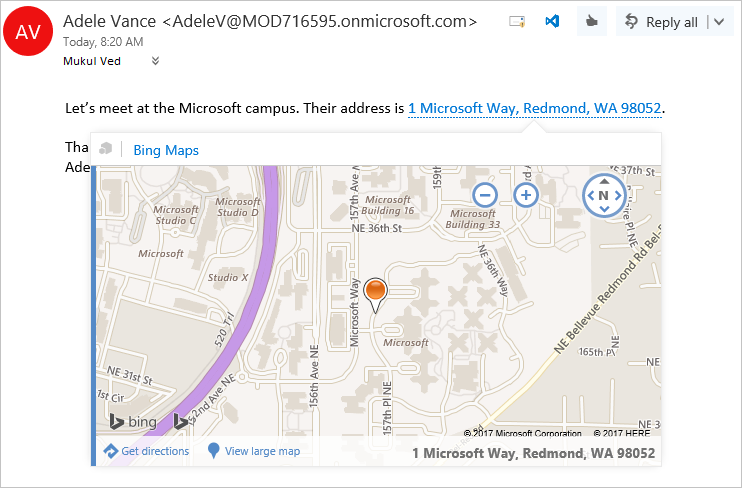
A contextual add-in’s manifest must include an ExtensionPoint element with an xsi:type attribute set to DetectedEntity. Within the ExtensionPoint element, the add-in specifies the entities or regular expression that can activate it. If an entity is specified, the entity can be any of the properties in the Entities object.
As such, the add-in manifest must contain a rule of type ItemHasKnownEntity or ItemHasRegularExpressionMatch. The following example shows how to specify that an add-in should activate on messages when it detects a phone number.
| |
After a contextual add-in is associated with an account, it will automatically start when the user clicks a highlighted entity or regular expression.
A user launches a contextual add-in through text, either a known entity or a developer’s regular expression. Typically, a user identifies a contextual add-in because the entity is highlighted.
2.4.2.3. Module add-ins
Module add-ins appear in the Outlook navigation bar, right alongside mail, tasks, and calendars. You can use all of the features of the Outlook JavaScript API in your add-in, and create command buttons in the Outlook ribbon so the user can interact with the add-in content.
Module add-ins are only supported in Outlook 2016 or later on Windows.
The following image shows an example of a module extension add-in.
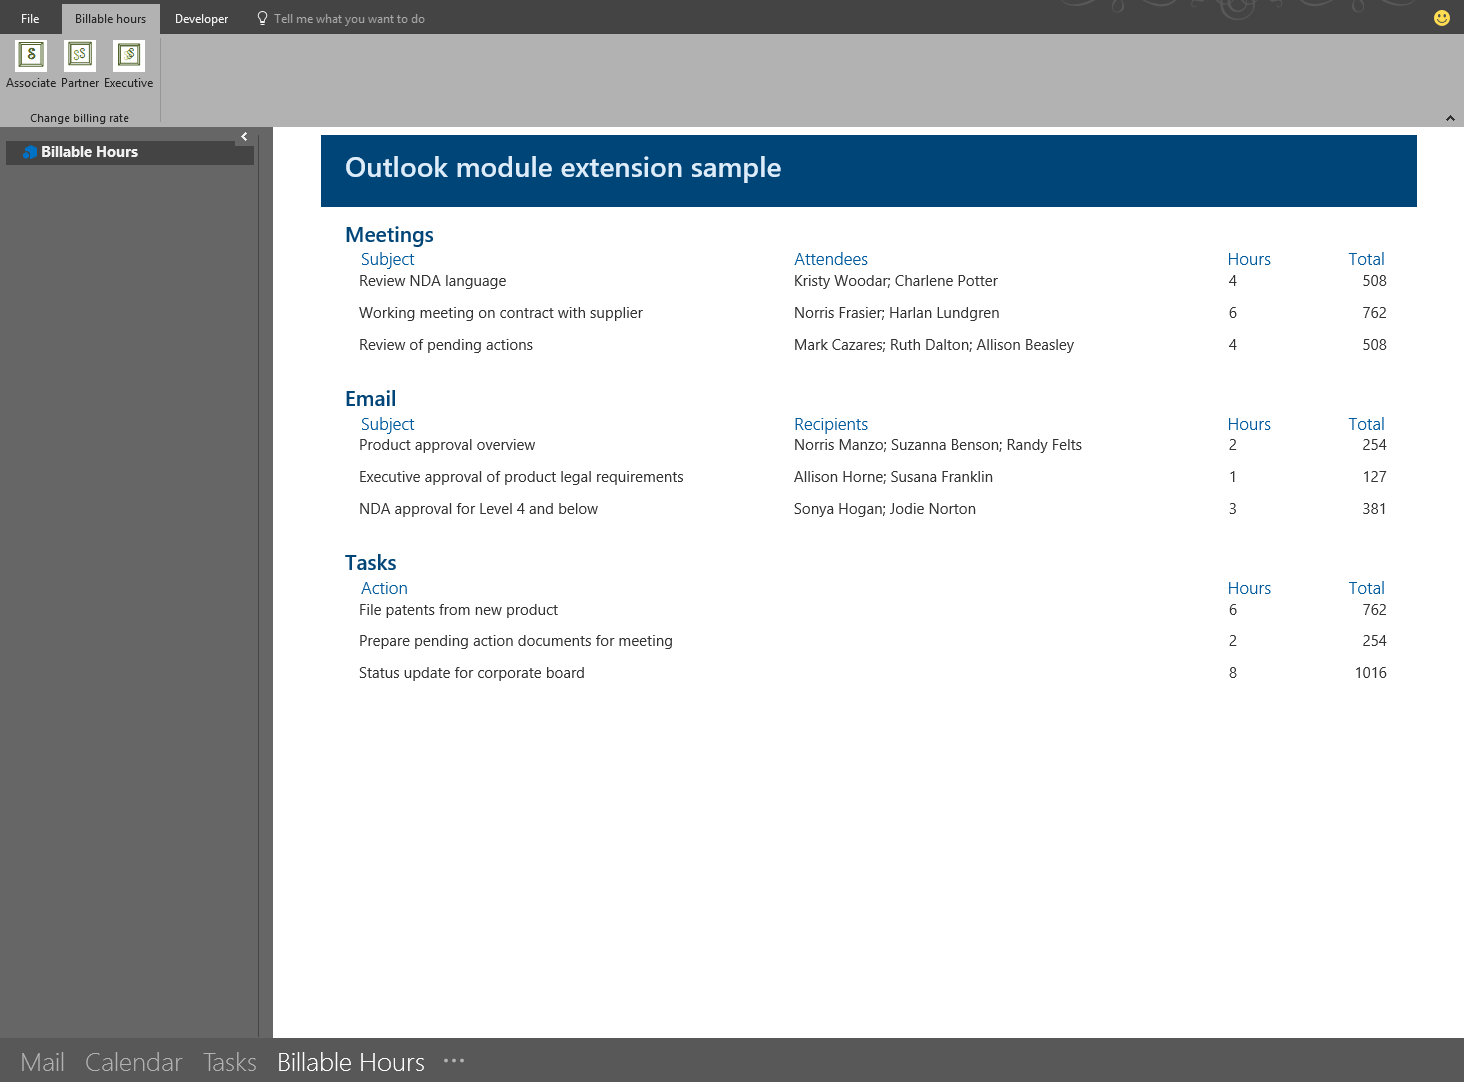
To make a module add-in, include the module extension point in your add-in’s manifest file. The following example shows a snippet of a manifest file adjusted to define a module extension.
| |
2.4.2.4. Getting started developing Outlook add-ins
To develop an Outlook add-in, use:
- The Yeoman generator for Office add-ins
- Visual Studio
You can use a template as your base then add your functionality.
2.5. Understand the capabilities of the Word JavaScript API
The Word JavaScript APIs give your add-ins access to Word documents. A Word add-in can manage the content, formatting, and structure of a document.
2.5.1. Object model
To understand the Word APIs, you must see how the main components of a document relate to each other.
- A Document contains a Body and at least one Section.
- A Body can contain:
- Paragraph (one or more)
- Table (one or more)
- List (one or more)
- Text
- Objects like images and lists
- A Section gives access to its body, headers, and footers.
2.5.2. Key scenarios
You can apply simple formatting to an entire existing document using the Office.js APIs. However, if you wish to apply complex formatting or use rich content objects, you can use Office Open XML (OOXML) to create these effects. Examples of capabilities in OOXML include applying drop shadows to text or pictures, coercing text boxes into shapes, and inserting Excel charts as live charts in Word documents. Because this is a more advanced skill, we will not cover this subject in its entirety but mention it for developers who are familiar with OOXML.
2.5.2.1. Working with document text
Word add-ins use the Office.onReady() event handler to start. If the add-in targets Word 2016 or later, it calls the Word.run() method to run Word JavaScript APIs. The add-in must pass a function to Word.run() that expects a context object to be passed as the parameter. The context object allows the add-in to interact with the Word document. You can use the context object to create any needed proxy objects for the Word document and load the proxies with any properties you wish to use. You can also program actions to run using those properties. As always, a context.sync() command then synchronizes the state between the proxy objects and objects in the Word document.
The following example shows code that inserts text after the body text of a Word document. For simplicity, this sample omits the Office.onReady() code and focuses on the code within a Word.run() code block.
| |
2.5.2.2. Search
You can use the APIs to search the document for text that meets your criteria. You can also scope your search to certain types of content, for example, paragraphs or tables.
The following code sample searches for the text “video you” and ignores punctuation. If the text is found, the matches are bolded, highlighted in yellow, and the font color set to purple.
| |
2.5.3. Getting started developing Word add-ins
To develop a Word add-in, use:
- The Yeoman generator for Office add-ins
- Visual Studio
If you want to explore the APIs more, the Script Lab add-in is recommended. There, you’ll see many TypeScript and JavaScript snippets and be able to experiment with Word documents without creating an entire add-in.
2.6. Understand the capabilities of custom functions
Custom functions have several unique capabilities and restrictions because they run in a separate runtime from other add-in interactions, like task panes.
2.6.1. Custom function capabilities
You can create custom JavaScript or TypeScript functions that can be accessed like built-in Excel functions such as SUM(). You can also create streaming custom functions, which return a value based on a timer. For example, you can update the current time value in a cell every second. You can make network calls from custom functions as well.
The following code sample defines the custom function add that accepts two numbers then returns their sum.
| |
JSDoc code comment descriptions
The JSDoc tags in the code comments are used to generate a JSON metadata file that describes the custom function to Excel. The JSON metadata file enables Excel to accurately present information to a user and pass expected parameters to your custom function.
- @customfunction: Is declared first and indicates it’s a custom function. Required.
- @param: Describes the parameter. Include for each parameter defined by the function.
- @returns: Describes what the function outputs.
The comment description “Adds two numbers.” is also added to the JSON Metadata file for Excel to display when the user is viewing your custom function.
2.6.2. Custom function runtime restrictions
The custom function runtime only runs JavaScript. There’s no document object model (DOM) or local storage, as you would find in a browser-based JavaScript runtime environment. This means you can’t load any libraries that use the DOM, such as jQuery. Also, you can’t access the Office.js API to interact with the document like you can from a task pane. Instead, the custom functions runtime is optimized for tasks such as performing rapid calculations and generally doesn’t need to use some of the Office.js APIs such as formatting tools in Excel.
Custom functions have a webpage that loads the custom functions runtime. Since the custom functions runtime doesn’t have a UI, there’s nothing for the webpage to display. You’ll find the following script tag in the webpage that loads the library for the custom functions runtime.
| |
Typically custom functions are combined with a task pane in the same add-in. If you create your add-in project using the Yeoman generator for Office add-ins, the project will have a webpage for the custom functions, and a web page with UI for the task pane.
2.6.3. Using storage API to communicate with the task pane
Custom function code and task pane code (which uses Office.js) can’t call or communicate directly with each other. But you can use a storage API that allows them to share data. A common scenario for using the storage API is when the add-in needs to share a security token for accessing a secure network resource. The user might first call a custom function that requires them to be signed in. After authentication, it receives the security token. Then it shares the security token using the storage API so that later, when the user opens the task pane, the task pane doesn’t need to sign them in again.
Alternatively, the user might open the task pane first. In this case, the task pane will sign in the user and share the security token through the storage API. When a custom function is used later, the custom function can get the security token through the storage API.
2.6.3.1. Storage API example
| |
2.6.4. Dialog API
Custom functions have their own dialog API since they can’t access the Office.js API. However, the functionality is similar. The most common scenario is to launch a dialog to sign in a user and receive a security token.
The following code sample shows how to display a web dialog from a custom function.
| |
2.6.5. Creating a custom functions project
You can create a custom functions project by using the Yeoman generator for Office add-ins. Run yo office to start the generator, then choose the Excel Custom Functions add-in project option. Once created, your project will contain a /src/taskpane/ folder for the task pane source files, and a /src/functions folder for the custom function source files.
3. Understand how to customize Office add-ins
Customize Office add-ins using persisted state, Office UI Fabric, and Microsoft Graph.
3.1. Understand the options for persisting state and settings
The Office add-ins platform provides several ways for your add-in to persist state and settings. Your options depend on the Office applications you plan to support and on the type of add-in you plan to develop.
The Office JavaScript API provides objects for your add-in to save state across user sessions. The following table lists the options, along with the supported add-in types and Office host applications.
| Platform | Major Office version | Subscription or one-time purchase? | Notes |
|---|---|---|---|
| Windows | Not applicable | connected to Office 365 subscription | Not available in OneNote |
| 2019 | one-time purchase | Not available in OneNote | |
| 2016 | one-time purchase | Only available in Outlook on Exchange 2016 (requires post-release update) or later. Not available in Office other applications. | |
| 2013 | one-time purchase | Only available in Outlook on Exchange 2016 or later. Requires post-release updates for Outlook and Exchange 2016. Not available in other Office applications. | |
| Mac | Not applicable | connected to Office 365 subscription | Not available in OneNote |
| 2019 | one-time purchase | Not available in OneNote | |
| 2016 | one-time purchase | Not available in OneNote | |
| iOS | Not applicable | connected to Office 365 subscription | Only available in Outlook |
| Android | Not applicable | connected to Office 365 subscription | Only available in Outlook |
| web browser | Not applicable | Not applicable | Available in all supported Office applications |
3.2. Understand Office UI Fabric in Office add-ins
As you build your add-in, you have many UI design factors to consider. The Office UI Fabric provides elements that adhere to Office branding so your add-in looks like a natural extension of Office.
- Fabric Core - Provides basic elements like font, icons, and color
- Fabric React components - Includes Fabric Core elements and adds input, navigation, and notification components, among others
3.2.1. Fabric Core
Fabric Core provides basic design elements that reflect or sync with Office branding.
To start using Fabric Core, reference the CSS in your HTML page, as shown in the following code.
| |
You can then use Fabric icons, fonts, and colors. The following example shows how you can include an extra-large table icon in the Office application’s primary theme color.
| |
3.2.2. Fabric components
Fabric React provides UX components for input, navigation, notification, and other categories. It builds on and includes Fabric Core.
Recommended components you can use in your add-in are as follows:
- Breadcrumb
- Button
- Checkbox
- ChoiceGroup
- Dropdown
- Label
- List
- Pivot
- TextField
- Toggle
You can use the Yeoman generator for Office add-ins to create a project that references Fabric React. An available project type is Office add-in Task Pane project using React framework.
3.3. Understand when and how to use Microsoft Graph in Office add-ins
Your add-in can connect to Microsoft Graph and access the user’s data so they can accomplish more useful and productive scenarios. Example tasks are:
- Read files from OneDrive
- Fetch email attachments
- Get the user’s profile
3.3.1. Why use Microsoft Graph
Microsoft Graph REST APIs provide a way for your add-in to access the user’s data in services like:
- Azure Active Directory
- Office 365 services
- Enterprise Mobility and Security services
- Windows 10 services
- Dynamics 365

3.3.2. How to authorize to Microsoft Graph
Authentication The add-in can get an access token from Azure Active Directory (AAD) when the user has signed in. AAD doesn’t allow its sign-in page to open in an iframe, and the add-in task pane is an iframe when the add-in is launched in Office on the Web. So, use the Office JavaScript Dialog API to display the AAD login form. If your add-in includes custom functions that need authorization to Microsoft Graph, use the custom functions Dialog API to display the login form.
Authorization After the user signs in, your add-in gets an access token to use in subsequent API calls to Microsoft Graph. The access token can never give the add-in more or greater permissions than the user has. Users typically only have permissions to data about themselves, their own files and email, and objects that have been shared with them. If your add-in gets Microsoft Graph data about multiple users, then it can be used successfully only by users with admin-level permissions.
Recommended libraries Depending on your development choices, you can use one of the following libraries for authentication and authorization as appropriate.
- Your server-side is on a .NET-based framework (for example, .NET Core or ASP.NET): use MSAL.NET
- Your server-side is node.js-based: use Passport Azure AD
- Your add-in uses Implicit flow: use msal.js
4. Understand testing, debugging, and deployment options for Office add-ins
4.1. Choose the best deployment option for your Office add-in
| Consider… | Examples |
|---|---|
| Add-in lifecycle stage | local developer testing, ready for public use |
| Add-in interaction or feature support | task pane add-in, content add-in, add-in commands |
| Target Office applications | Excel, Outlook |
| Target platforms | Windows, Mac |
| Scope of user base | your organization, general public |
4.1.1. Deployment options
| Option | Description | Best when… |
|---|---|---|
| Sideload | Install your add-in locally. | Developer building and testing add-in |
| Centralized deployment | Distribute your add-in to users via the Microsoft 365 admin center. | Add-in ready for use in your organization on Office 365 or in a hybrid environment |
| SharePoint catalog | Distribute add-in to users via SharePoint. | Task pane or content add-in ready for use in your organization that’s using an on-premises environment; Excel, Word, or PowerPoint is targeted but Mac isn’t a target platform |
| AppSource | Make add-in available to the public. | Add-in ready for public use |
| Exchange server | Distribute add-in to users via Exchange. | Outlook add-in ready for use in an organization whose environment doesn’t use Azure Active Directory identity service |
| Network share | Make add-in available to network users via a shared folder. | Add-in development and users are on Windows |
4.2. Understand testing and debugging concepts for Office add-ins
4.2.1. Sideload your add-in
You can locally install (sideload) your add-in for testing and debugging on Windows, Mac, and in a web browser. You can also sideload your Excel or Word add-in on an iPad. Use Node.js, Internet Information Services (IIS), or another preferred means to web host your add-in on your development machine.
If you create your project using the Yeoman generator for Office add-ins, you can run npm run start in a command-line prompt to start and sideload your add-in to Excel on Windows or npm run start:web to run it in a web browser, though you’ll have to manually sideload to Excel in the browser.
If you create your project using Visual Studio (VS), you can run the project in VS debug mode and it will automatically sideload to Excel on Windows.
4.2.2. Debug your add-in
- A web browser with the browser’s built-in developer tools
- Visual Studio, provided you prepared your add-in using this IDE
- Visual Studio Code for custom functions projects only
- Runtime logging on Windows and Mac
4.2.3. Windows
On Windows 10, the tool you use depends on if the add-in is running in Microsoft Edge or Internet Explorer. Your add-in is running in Internet Explorer 11 unless it meets the following criteria to be running in Microsoft Edge.
- Windows 10 (version 1903 or later)
- Office 365 subscription (build 16.0.11629 or later)
For Microsoft Edge, install and use Microsoft Edge DevTools. For Internet Explorer, run F12 developer tools according to your Office version:
- 32-bit Office version: C:\Windows\System32\F12\IEChooser.exe
- 64-bit Office version: C:\Windows\SysWOW64\F12\IEChooser.exe
An available option to debug task pane add-ins in Office 2016 or later is to attach a debugger. Where the Attach Debugger is available through the Personality menu, as shown in the following image, the supported tool is Visual Studio 2015 Update 3 or later. This tool only enables JavaScript debugging.
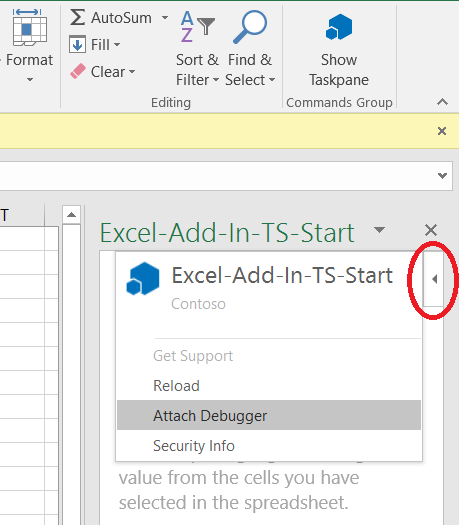
If the Personality menu isn’t present or you’re already using Visual Studio (VS), you can use Attach to Process in VS to debug the add-in in Microsoft Edge or Internet Explorer as applicable.
4.2.4. Mac
For your sideloaded task pane and content add-ins, you can use the Safari Web Inspector on macOS High Sierra and Office version 16.9.1 (build 18012504) or later.
